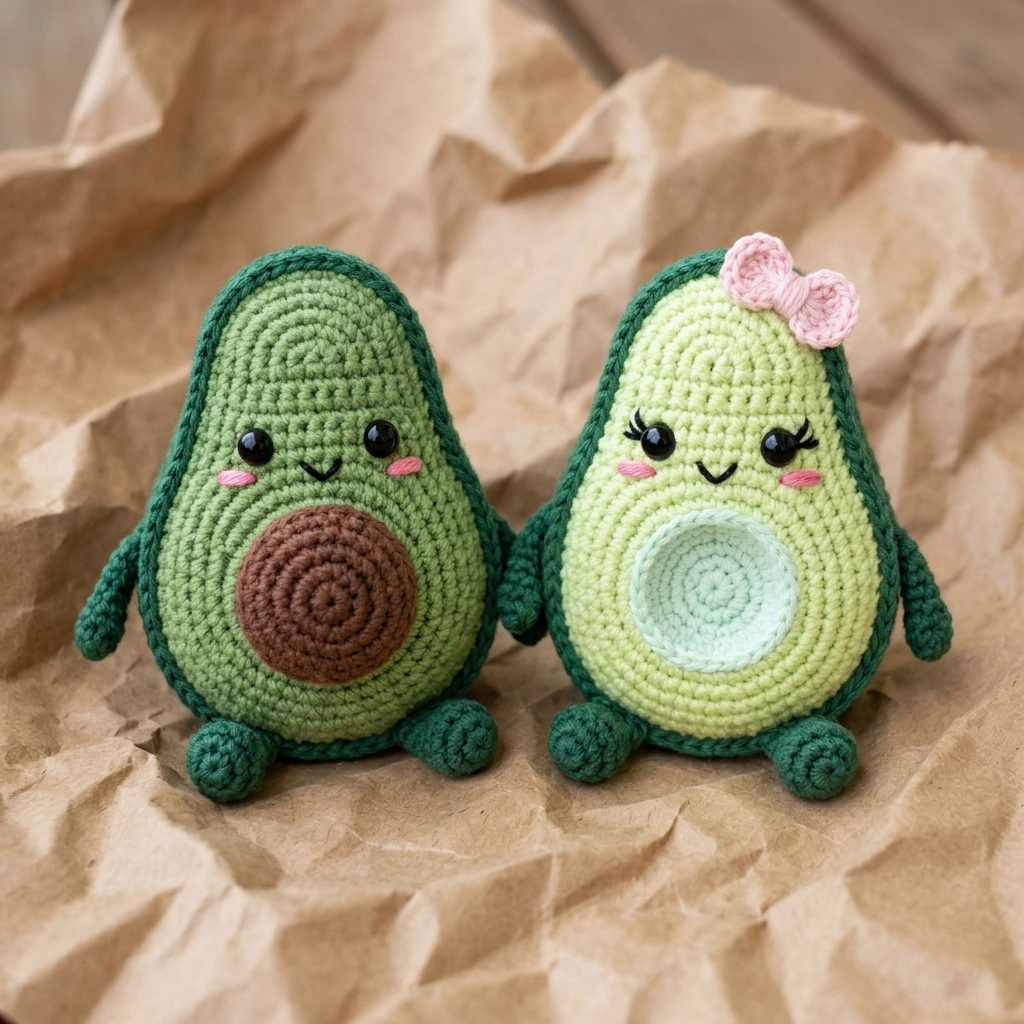
These two little avocado friends are about to become your new favorite project. One has a sweet brown pit, the other has an empty pit hole where the seed popped out. They are holding hands. They have tiny blushing cheeks. I mean, come on. If you have ever wanted to make a crochet pattern that makes people audibly say “aww,” this is the one.
This avocado couple amigurumi is perfect for Valentine’s Day gifts, anniversary presents, or just because you need something adorable on your desk. The best part? Even if you have only made a few amigurumi before, you can absolutely handle this crochet tutorial. We are working in continuous rounds with basic increases and decreases. Nothing scary here.
Let me walk you through everything step by step.
What Makes This Avocado Amigurumi Pattern Special
Most avocado patterns give you one avocado. This pattern gives you a matching pair. One avocado has the pit (the little brown circle in the center), and the other has the pit hole (the lighter indent where the pit would fit). Together they make a complete set.
The dark green edging around each avocado body creates that realistic skin effect. The little arms let them hold hands, which honestly is the cutest detail. Add embroidered faces with rosy cheeks and optional eyelashes, and you have a gift-worthy couple that looks way harder to make than it actually is.
The bow on one avocado is totally optional. You can make two identical avocados, give them both bows, or skip the bow entirely. Your avocados, your rules.
Materials You Will Need
Yarn:
- Light green yarn (lime or chartreuse) for the flesh, worsted weight, approximately 50 grams
- Dark green yarn (forest or hunter green) for the skin and arms, worsted weight, approximately 30 grams
- Brown yarn for the pit, worsted weight, approximately 10 grams
- Very light green or cream yarn for the pit hole, worsted weight, approximately 5 grams
- Pink yarn for cheeks and bow, small amount
- Black embroidery thread or thin black yarn for mouth
Tools:
- 3.0mm crochet hook (or size needed to achieve tight stitches with no gaps)
- 6mm black safety eyes, 4 total
- Tapestry needle
- Stitch marker
- Polyester fiberfill stuffing
- Scissors
- Pins for placement
Gauge: Gauge is not critical for amigurumi, but your stitches should be tight enough that stuffing does not show through. If you see gaps, go down a hook size.
Finished Size: Each avocado measures approximately 4.5 inches tall and 3 inches wide when stuffed.
Stitches and Abbreviations
Let me define every stitch before we begin. Read through this section once so nothing surprises you mid-project.
Magic Ring (MR): A technique to start crocheting in the round with no hole in the center. You wrap yarn around your fingers, pull up a loop, chain one, then work your first round of stitches into the ring. Pull the tail to close the hole tight.
Chain (ch): The most basic crochet stitch. Yarn over, pull through the loop on your hook. Example: ch 4 means make 4 chain stitches in a row.
Single Crochet (sc): Insert hook into stitch, yarn over, pull up a loop (2 loops on hook), yarn over, pull through both loops. This is your main stitch for the entire project.
Increase (inc): Work 2 single crochet stitches into the same stitch. This adds one stitch to your count. Example: if a row says “sc, inc” you work one single crochet, then two single crochets in the next stitch.
Decrease (dec): Also called invisible decrease. Insert hook through front loops only of next 2 stitches, yarn over, pull through both front loops (2 loops on hook), yarn over, pull through both. This removes one stitch and keeps the surface smooth.
Slip Stitch (sl st): Insert hook, yarn over, pull through stitch and loop on hook in one motion. Used for joining and finishing.
Front Loop Only (FLO): Work into only the front loop of the stitch instead of both loops. Creates a ridge on the back.
Back Loop Only (BLO): Work into only the back loop. Creates a ridge on the front.
How to Crochet the Avocado Body (Make 2)
Both avocados use the same body pattern. You will make two identical body pieces for each avocado, then whip stitch them together. Work in continuous rounds. Do not join at the end of each round. Use a stitch marker to track your first stitch.
Front Panel (Light Green):
Round 1: MR, 6 sc into ring, pull tight (6 sts)
Round 2: Inc in each st around (12 sts)
Round 3: *Sc, inc* repeat around (18 sts)
Round 4: *Sc 2, inc* repeat around (24 sts)
Round 5: *Sc 3, inc* repeat around (30 sts)
Round 6: *Sc 4, inc* repeat around (36 sts)
Round 7: *Sc 5, inc* repeat around (42 sts)
Rounds 8 through 14: Sc in each st around (42 sts) — 7 rounds total of straight single crochet
Round 15: *Sc 5, dec* repeat around (36 sts)
Round 16: *Sc 4, dec* repeat around (30 sts)
Round 17: *Sc 3, dec* repeat around (24 sts)
Round 18: *Sc 2, dec* repeat around (18 sts)
Round 19: *Sc 1, dec* repeat around (12 sts)
Round 20: *Sc 4, dec* repeat twice (10 sts)
Fasten off, leave a long tail for sewing. This creates the slightly tapered top of the avocado.
Back Panel (Light Green):
Work Rounds 1 through 7 exactly as the front panel. Stop after Round 7 (42 sts). Fasten off, leave a long tail.
The back panel is flatter because we skip the shaping rounds. This gives the avocado that classic halved look.
How to Crochet the Pit (For Avocado 1)
This is the brown seed that sits in the center of one avocado.
With brown yarn:
Round 1: MR, 6 sc into ring (6 sts)
Round 2: Inc in each st around (12 sts)
Round 3: *Sc, inc* repeat around (18 sts)
Round 4: *Sc 2, inc* repeat around (24 sts)
Rounds 5 and 6: Sc in each st around (24 sts)
Sl st to next st, fasten off, leave tail for sewing.
The pit should look like a shallow dome. Stuff it lightly before attaching to give it dimension.
How to Crochet the Pit Hole (For Avocado 2)
This creates the indent where the pit used to be. Use very light green or cream yarn.
Round 1: MR, 6 sc into ring (6 sts)
Round 2: Inc in each st around (12 sts)
Round 3: *Sc, inc* repeat around (18 sts)
Round 4: Working in BLO only, sc in each st around (18 sts)
Round 5: Sc in each st around through both loops (18 sts)
Sl st, fasten off, leave tail.
The back loop only round creates a ridge that makes the piece curl inward, forming that bowl shape. Do not stuff this piece. You want it to look like a hollow indent.
How to Crochet the Dark Green Skin Edging
This edging wraps around the outside of each avocado and creates that realistic skin effect.
With dark green yarn:
Ch 70. This should be long enough to wrap around your assembled avocado body with a little overlap.
Row 1: Sc in second ch from hook, sc in each ch across (69 sts)
Fasten off, leave long tail.
Make 4 strips total, 2 per avocado.
Alternative method: If you prefer, you can surface crochet the edging directly onto the body after assembly. Hold dark green yarn behind the work and pull loops through around the outer edge. Both methods work well.
How to Crochet the Arms (Make 4)
Each avocado has two little arms. These are simple tubes.
With dark green yarn:
Round 1: MR, 5 sc into ring (5 sts)
Rounds 2 through 6: Sc in each st around (5 sts) — 5 rounds total
Sl st, fasten off, leave tail. Do not stuff the arms. They should be floppy so they can hold hands.
How to Crochet the Feet (Make 4)
With dark green yarn:
Round 1: MR, 6 sc into ring (6 sts)
Round 2: Inc in each st around (12 sts)
Rounds 3 and 4: Sc in each st around (12 sts)
Sl st, fasten off, leave tail. Stuff lightly.
How to Crochet the Bow (Optional)
With pink yarn:
Ch 8.
Row 1: Sc in second ch from hook, sc in each ch across (7 sts)
Rows 2 through 4: Ch 1, turn, sc in each st across (7 sts)
Fasten off, leave tail.
Pinch the rectangle in the center and wrap yarn around the middle several times. Tie off to secure the bow shape. Attach to top of one avocado head.
Assembly Instructions
This is where your avocados come to life. Take your time here.
Step 1: Attach the pit or pit hole to the center of the front panel before joining front and back. Pin in place first, then whip stitch around the edges with matching yarn.
Step 2: Place front and back panels together with wrong sides facing inward. Using dark green yarn, whip stitch or slip stitch around the outer edge to join. Leave a 2-inch opening at the bottom.
Step 3: Stuff the body firmly. You want it to hold its shape but not bulge.
Step 4: Close the opening with more stitches.
Step 5: Attach the dark green edging strip around the outer perimeter of each avocado. Sew in place with matching yarn, covering the seam where front and back panels meet.
Step 6: Attach feet to the bottom of each avocado, spacing evenly.
Step 7: Attach arms to the sides, positioning them so they can reach toward each other.
Step 8: Install safety eyes. Position them above the pit or pit hole, about 8 to 10 rounds up from center. Insert through the fabric, add the washer backing, and push firmly until locked.
Step 9: Embroider the face. Use black thread to create a small curved smile below the eyes. Use pink yarn to create two small satin stitch circles for rosy cheeks. For the avocado with eyelashes, make 3 small straight stitches fanning out from the outer corner of each eye.
Step 10: Attach the bow if using.
Step 11: To make them hold hands, position the arms so the ends overlap and tack them together with a few stitches in matching green yarn.
Tips for Success
Tight stitches matter. Amigurumi should have no visible gaps. If stuffing peeks through, your hook is too large or your tension is too loose.
Stuff as you go. For the body especially, add stuffing before the opening gets too small to reach inside comfortably.
Pin everything first. Before you sew any piece permanently, pin it in place and look at the whole avocado. Adjust until you are happy with placement.
Safety eyes must go on before stuffing. Once the washer is attached, you cannot remove safety eyes without damaging the fabric.
Why This Crochet Pattern Makes a Perfect Gift
Handmade gifts hit different. These avocados are small enough to sit on a desk, nightstand, or car dashboard. They are sturdy enough for gentle play. The “better together” symbolism makes them ideal for couples, best friends, or anyone who appreciates cute things.
You can customize the faces to match personalities. Add glasses with wire. Change the bow to a tiny hat. Make one avocado slightly larger than the other. The basic pattern gives you a canvas to personalize.
Thank You for Making With Me
I really appreciate you choosing this avocado couple amigurumi pattern for your next project. I hope the step by step instructions made everything clear. If you run into any tricky spots, read through that section again slowly. Crochet rewards patience.
When you finish your avocado pair, I would absolutely love to see them. Tag me on Instagram or share in my Facebook group. Seeing your finished projects genuinely makes my day.
Happy crocheting, friend. You have got this.