She is absolutely enchanting, isn’t she? This coral mermaid amigurumi doll combines everything I love about crochet. Soft chenille yarn. Sweet facial details. A flowing braided hairstyle that cascades down her back. If you have basic amigurumi experience under your belt, you can absolutely make her.
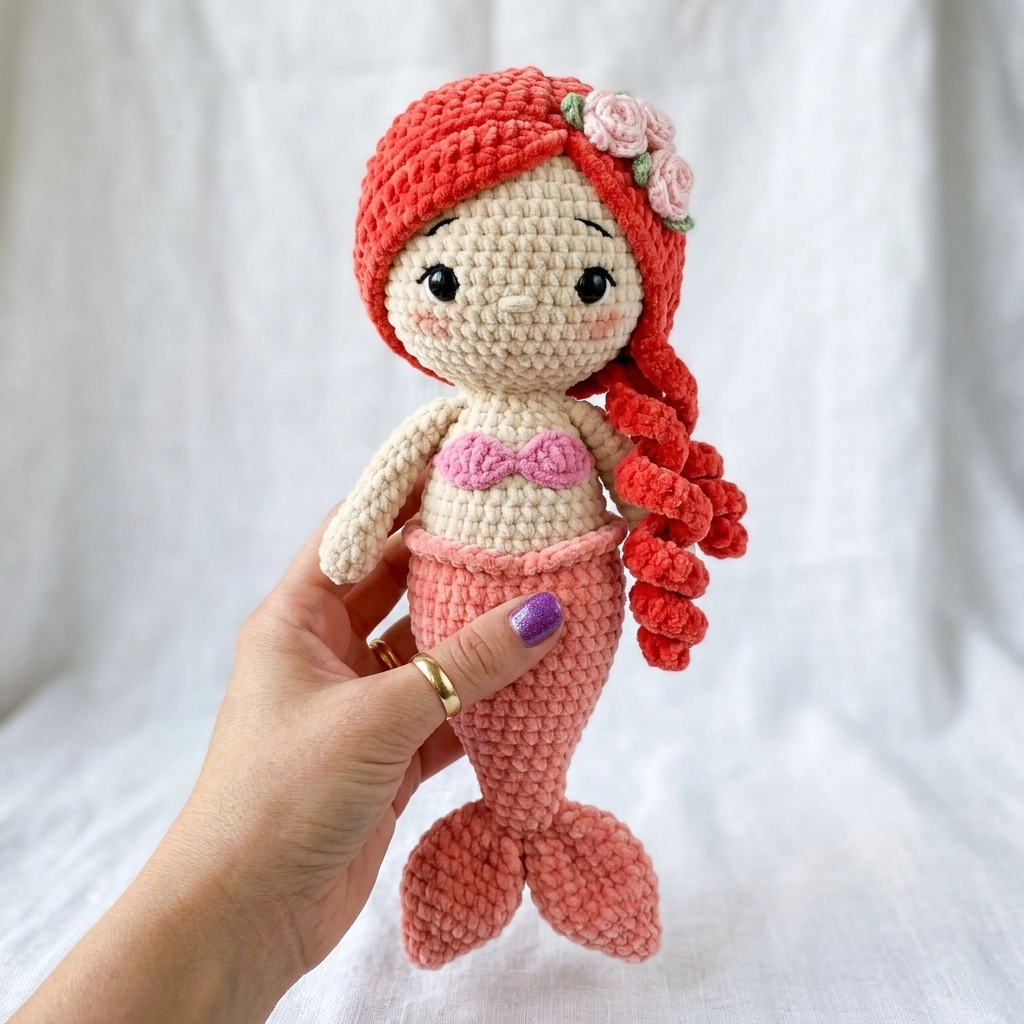
This crochet pattern walks you through every piece of this mermaid doll step by step. Her body, tail, flowing hair, tiny seashell top, delicate flower accents. Everything. By the end, you will have a huggable mermaid standing approximately 12 inches tall. Perfect for gifting, nursery decor, or your own collection.
Let me show you exactly how to bring her to life.
Why This Mermaid Amigurumi Doll Pattern Works
What makes this crochet tutorial special is the yarn choice. This mermaid uses chenille yarn, sometimes called velvet yarn or plush yarn. It creates that soft, squishy texture you see in the photo. The stitches have a pillowy quality that standard cotton or acrylic simply cannot replicate.
The construction is modular. You crochet each piece separately, then assemble. Head, body, arms, tail, hair cap, fins, flowers. This approach means you can work on small sections at a time. No marathon sessions required.
The skill level sits at confident beginner to intermediate. You need to know how to crochet in the round, increase, decrease, and seam pieces together. If those terms feel comfortable, you are ready.
Materials You Will Need
Gather these supplies before starting your coral mermaid crochet pattern:
Yarn:
- Chenille/velvet yarn in coral or salmon pink (approximately 150g for tail and hair)
- Chenille/velvet yarn in cream or skin tone (approximately 80g for head and body)
- Chenille/velvet yarn in light pink (approximately 30g for seashell top and waistband)
- Small amounts of dark pink chenille for shell texture
- Small amounts of light pink and green for flowers and leaves
I used a bulky weight (5) chenille yarn. Brands like Bernat Blanket, Himalaya Dolphin Baby, or YarnArt Dolce work beautifully.
Hook:
- 4.0mm crochet hook for chenille yarn
- 2.5mm hook for small flower details (optional, if using thinner yarn for flowers)
Notions:
- 12mm safety eyes (black)
- Fiberfill stuffing
- Yarn needle
- Stitch markers
- Black embroidery floss for eyebrows
- Pink embroidery floss or yarn for mouth and cheek details
- Scissors
Abbreviations and Stitch Definitions
Let me define every stitch before we begin. Refer back here anytime you need a refresher.
Magic ring (MR): An adjustable starting loop that closes completely. You chain 2, work stitches into the first chain, then pull the tail to close the center hole.
Chain (ch): The foundation stitch. Yarn over, pull through loop on hook.
Single crochet (sc): Insert hook into stitch, yarn over, pull up a loop (2 loops on hook), yarn over, pull through both loops.
Increase (inc): Work 2 single crochet stitches into the same stitch. This adds one stitch to your count.
Invisible decrease (dec): Insert hook through front loops only of the next 2 stitches, yarn over, pull through both front loops, yarn over, pull through both loops on hook. Creates a neater decrease than standard method.
Slip stitch (sl st): Insert hook, yarn over, pull through stitch and loop on hook in one motion. Used for joining or moving position.
Front loop only (FLO): Work into only the front loop of the stitch, leaving the back loop unworked.
Back loop only (BLO): Work into only the back loop of the stitch.
Fasten off (FO): Cut yarn, pull tail through final loop to secure.
The Pattern: Step by Step Instructions
Head
The head is worked in continuous rounds. Do not join at the end of each round. Use a stitch marker to track your first stitch.
Using cream chenille yarn and 4.0mm hook:
Rnd 1: MR, 6 sc into ring (6 sts)
Rnd 2: Inc in each st around (12 sts)
Rnd 3: *Sc 1, inc* repeat around (18 sts)
Rnd 4: *Sc 2, inc* repeat around (24 sts)
Rnd 5: *Sc 3, inc* repeat around (30 sts)
Rnd 6: *Sc 4, inc* repeat around (36 sts)
Rnd 7: *Sc 5, inc* repeat around (42 sts)
Rnds 8 to 14: Sc in each st around (42 sts) – 7 rounds total
Rnd 15: *Sc 5, dec* repeat around (36 sts)
Insert safety eyes between rounds 10 and 11, approximately 8 stitches apart. The chenille yarn is forgiving, so adjust placement until you like the look.
Rnd 16: *Sc 4, dec* repeat around (30 sts)
Rnd 17: *Sc 3, dec* repeat around (24 sts)
Begin stuffing firmly with fiberfill. Add more as you close.
Rnd 18: *Sc 2, dec* repeat around (18 sts)
Rnd 19: *Sc 1, dec* repeat around (12 sts)
Rnd 20: Dec around (6 sts)
Fasten off, leave a long tail. Use yarn needle to close the remaining hole by weaving through front loops and pulling tight.
Body
The body connects directly to the head later. Work it as a separate piece for now.
Using cream chenille yarn:
Rnd 1: MR, 6 sc into ring (6 sts)
Rnd 2: Inc in each st around (12 sts)
Rnd 3: *Sc 1, inc* repeat around (18 sts)
Rnd 4: *Sc 2, inc* repeat around (24 sts)
Rnds 5 to 8: Sc in each st around (24 sts) – 4 rounds
Rnd 9: *Sc 2, dec* repeat around (18 sts)
Rnds 10 to 12: Sc in each st around (18 sts) – 3 rounds
Fasten off, leaving a long tail for sewing to head. Stuff firmly but not rock hard. You want some give.
Arms (Make 2)
Using cream chenille yarn:
Rnd 1: MR, 6 sc into ring (6 sts)
Rnd 2: *Sc 1, inc* repeat around (9 sts)
Rnds 3 to 12: Sc in each st around (9 sts) – 10 rounds
Sl st to next st, fasten off with long tail. Stuff lightly, mostly in the hand area. Leave the upper arm softer so it hangs naturally.
Mermaid Tail
This is where the coral color shines. The tail works from the waist down.
Using coral chenille yarn:
Rnd 1: MR, 6 sc into ring (6 sts)
Rnd 2: Inc in each st around (12 sts)
Rnd 3: *Sc 1, inc* repeat around (18 sts)
Rnd 4: *Sc 2, inc* repeat around (24 sts)
Rnds 5 to 8: Sc in each st around (24 sts) – 4 rounds
Rnd 9: *Sc 3, inc* repeat around (30 sts)
Rnds 10 to 14: Sc in each st around (30 sts) – 5 rounds
Rnd 15: *Sc 3, dec* repeat around (24 sts)
Rnds 16 to 18: Sc in each st around (24 sts) – 3 rounds
Rnd 19: *Sc 2, dec* repeat around (18 sts)
Rnds 20 to 22: Sc in each st around (18 sts) – 3 rounds
Rnd 23: *Sc 1, dec* repeat around (12 sts)
Rnds 24 to 26: Sc in each st around (12 sts) – 3 rounds
Fasten off, leaving tail open. Stuff firmly. The tail will attach over the body bottom.
Tail Fins (Make 2)
Using coral chenille yarn:
Rnd 1: MR, 6 sc into ring (6 sts)
Rnd 2: Inc in each st around (12 sts)
Rnd 3: *Sc 1, inc* repeat around (18 sts)
Rnds 4 to 6: Sc in each st around (18 sts) – 3 rounds
Rnd 7: *Sc 1, dec* repeat around (12 sts)
Rnd 8: Sc in each st around (12 sts)
Fasten off with long tail. Stuff lightly. Flatten slightly when attaching to create that classic fin shape. Sew both fins to the bottom of the tail, angled outward.
Hair Cap
The hair cap sits on top of the head and provides the base for the hairstyle.
Using coral chenille yarn:
Rnd 1: MR, 6 sc into ring (6 sts)
Rnd 2: Inc in each st around (12 sts)
Rnd 3: *Sc 1, inc* repeat around (18 sts)
Rnd 4: *Sc 2, inc* repeat around (24 sts)
Rnd 5: *Sc 3, inc* repeat around (30 sts)
Rnd 6: *Sc 4, inc* repeat around (36 sts)
Rnd 7: *Sc 5, inc* repeat around (42 sts)
Rnds 8 to 12: Sc in each st around (42 sts) – 5 rounds
Fasten off with long tail. Do not stuff. This piece sits like a cap over the head.
Braided Hair Strands
For the long braid, cut approximately 40 strands of coral yarn, each about 24 inches long. Divide into three groups. Attach all strands to the back of the hair cap by folding in half and pulling through stitches (like fringe). Braid the three sections together. Secure the end with a small yarn tie.
The curly texture you see happens naturally with chenille yarn when you handle the braid. You can also twist small sections for added dimension.
Seashell Top
Using light pink chenille yarn:
Ch 10, turn.
Row 1: Sc in 2nd ch from hook, sc across (9 sts)
Rows 2 to 4: Ch 1, turn, sc across (9 sts)
Fasten off. Make a second piece identical.
For the shell texture, use dark pink yarn to add small bobble stitches or French knots across the surface. Sew both shell pieces to the front of the body at chest level, slightly angled to look like a bikini top.
Waist Ruffle
Using light pink chenille yarn:
Ch 31 (or enough to wrap around the waist).
Row 1: Sc in 2nd ch from hook, 2 sc in each st across (60 sts)
This creates a natural ruffle. Fasten off. Sew around the waist where the body meets the tail.
Small Roses (Make 2 or 3)
Using light pink yarn and smaller hook if desired:
Ch 15.
Row 1: Sc in 2nd ch from hook, *sk 1, 5 dc in next st, sk 1, sc* repeat across.
Fasten off with long tail. Roll the strip into a spiral, stitching the bottom as you go to secure the rose shape.
Leaves (Make 2 or 3)
Using green yarn:
Ch 6.
Row 1: Sl st in 2nd ch from hook, sc, hdc, dc, 5 dc in last ch. Working on opposite side of chain: dc, hdc, sc, sl st.
Fasten off. Attach behind roses.
Assembly Guide
Now comes the satisfying part. Bringing all pieces together.
1. Sew the head to the body. Use the long tail from the body. Whip stitch around the neck opening, keeping stitches tight but not puckered.
2. Attach arms. Position arms at shoulder level on either side of the body. Sew securely using the arm tails.
3. Slide the tail over the lower body. The tail opening should fit snugly over the bottom of the torso. Sew around the waist to secure.
4. Attach tail fins. Position at the bottom of the tail, angled outward. Stitch firmly.
5. Place the hair cap. Position on top of the head, covering the back and top. The forehead should show. Sew around the hairline edge.
6. Add the braid. Attach at the back of the hair cap. Let it drape over one shoulder.
7. Sew seashell top pieces. Position at chest level.
8. Attach waist ruffle. Sew around the waist seam.
9. Add roses and leaves. Tuck behind the ear area on the hair cap. Stitch securely.
10. Embroider face details. Use black embroidery floss to create small eyebrows above the safety eyes. Use pink for a tiny curved mouth and optional rosy cheeks.
Tips for Success
Chenille yarn is slippery. Count your stitches every few rounds. It is easy to accidentally skip or add stitches with this yarn texture.
Stuff as you go. Once you decrease past a certain point, getting stuffing into tight spaces becomes difficult. Add fiberfill gradually.
Use stitch markers generously. Mark your first stitch of every round. Mark where eyes will go before inserting. Mark arm and leg placements before sewing.
The face makes the doll. Take your time with eye placement and embroidered details. Small adjustments create big personality changes.
Wrapping Up Your Coral Mermaid Amigurumi
You did it. Every stitch, every piece, every tiny rose. This coral mermaid amigurumi doll crochet pattern gives you everything needed to create something truly special. She is soft, whimsical, and undeniably charming.
Whether you are making her for a little one who loves mermaids, a friend who collects handmade dolls, or simply yourself, this project delivers that deep creative satisfaction we crocheters crave.
Thank you so much for choosing this pattern and trusting me to guide you through. I genuinely hope your mermaid turns out beautifully.
I would absolutely love to see your finished doll. Tag me on Instagram or share in my Facebook group. Seeing your creations brings me so much joy. Happy crocheting, friend.