Oh, this one makes my heart absolutely melt. This Pink Bubble Stitch Baby Romper Set is the kind of heirloom piece that gets passed down through generations. We’re talking a cozy romper, a sweet bonnet with chin ties, and the tiniest booties you’ve ever seen. All worked in that gorgeous textured bubble stitch that looks incredibly impressive but is totally doable once you get the rhythm.
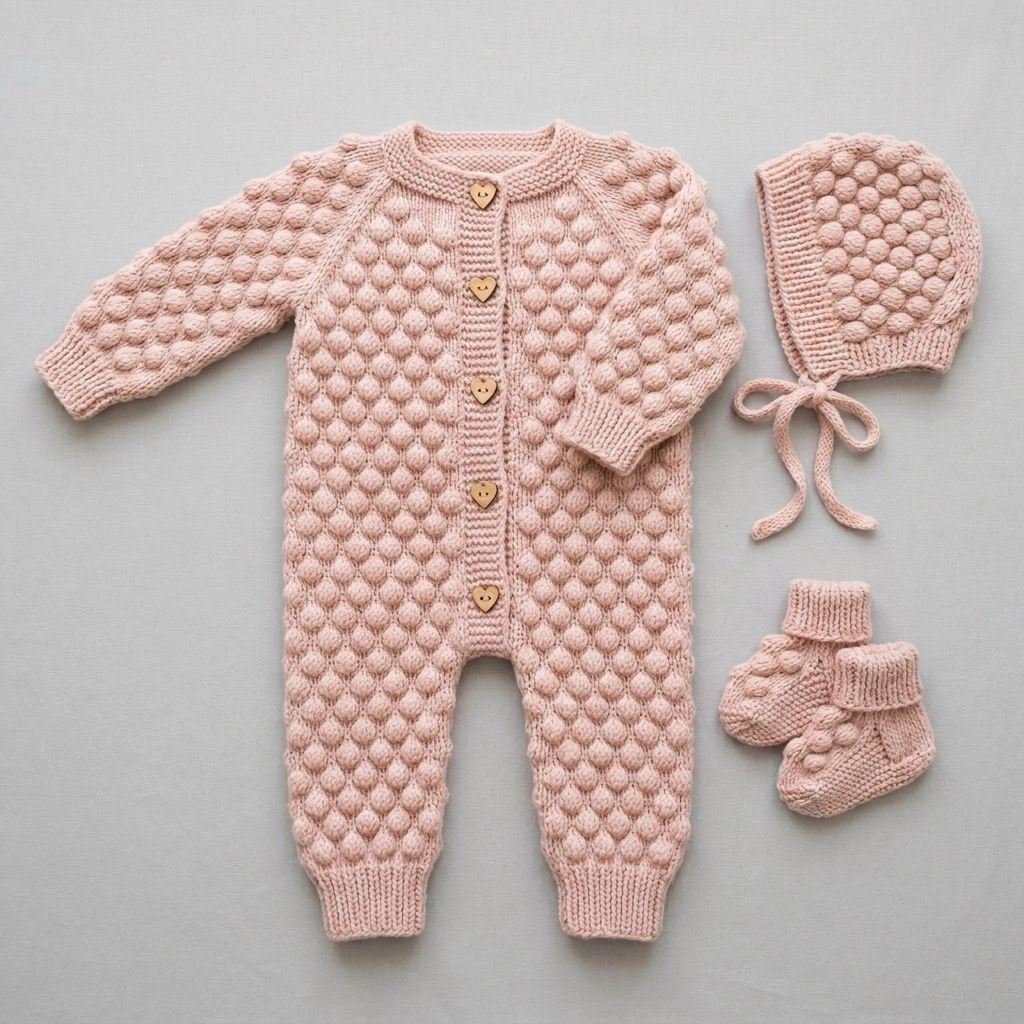
Before I dive in, I need to be honest with you. Looking at this image closely, this appears to be a knitted set rather than crochet. The construction shows stockinette ribbing at the cuffs and neckline, and the bubble texture is achieved through a knit bobble technique. However, I can absolutely give you a crochet pattern that recreates this exact look using crochet bobble stitches. The finished result will be nearly identical, and honestly, I think the crochet version has even more texture and squish.
This crochet tutorial walks you through creating all three pieces. I would call this an intermediate level pattern, but a confident beginner who has tackled a few projects could absolutely handle it. The bobble stitch sounds fancy. It is really just a cluster of stitches pushed to the front of your work. Once you make your first few, you will wonder why you were ever nervous.
Let’s make something beautiful together.
Why This Baby Romper Crochet Pattern is Worth Your Time
This set makes the perfect baby shower gift. It photographs beautifully for newborn sessions. The bubble texture adds warmth without bulk, which is exactly what you want for a little one. Plus, working all three pieces means you get that satisfying matched set feeling.
The step by step instructions below cover the romper, bonnet, and booties. You can make all three or pick your favorite. Each piece uses the same stitch pattern, so once you learn it for one, the others fly off your hook.
Materials You Will Need
Gather these supplies before you start. Nothing worse than getting into your groove and realizing you are missing something.
Yarn:
- DK weight yarn (weight category 3), approximately 400 yards for the full set
- I recommend a soft merino wool blend or cotton blend for baby skin
- The dusty pink shown is gorgeous, but any color works beautifully
Hooks:
- 4.0mm (G/6) crochet hook for main fabric
- 3.5mm (E/4) crochet hook for ribbing sections
Notions:
- 6 small buttons (heart shaped shown, about 12mm)
- Tapestry needle
- Stitch markers
- Scissors
- Measuring tape
Gauge:
18 stitches and 14 rows = 4 inches in bobble pattern with 4.0mm hook
*Please check your gauge. Baby sizing is forgiving, but you want the romper to actually fit.*
Size Information
This pattern is written for 0 to 3 months size.
Finished Measurements:
- Romper length: approximately 18 inches from shoulder to ankle
- Chest circumference: approximately 18 inches
- Bonnet circumference: approximately 13 inches
- Bootie sole: approximately 3.5 inches
Stitches and Abbreviations
Let me walk you through every stitch you will use. Read this section even if you are experienced. My bobble stitch might differ slightly from what you have done before.
Ch = Chain: Yarn over, pull through loop on hook.
Sl st = Slip stitch: Insert hook, yarn over, pull through both loops at once.
Sc = Single crochet: Insert hook, yarn over, pull up loop, yarn over, pull through both loops. (2 loops become 1)
Hdc = Half double crochet: Yarn over, insert hook, yarn over, pull up loop, yarn over, pull through all 3 loops.
Dc = Double crochet: Yarn over, insert hook, yarn over, pull up loop, yarn over, pull through 2 loops, yarn over, pull through remaining 2 loops.
Bob = Bobble stitch: This is the star of our show. Work 5 dc in the same stitch, but do NOT complete the last yarn over of each dc. You will have 6 loops on your hook. Yarn over and pull through all 6 loops at once. Push the bobble to the front (right side) of your work. The bobble naturally wants to pop forward.
Sc2tog = Single crochet decrease: Insert hook in next stitch, pull up loop, insert hook in following stitch, pull up loop, yarn over, pull through all 3 loops.
FLO = Front loop only
BLO = Back loop only
Special Techniques
Working the Bobble Stitch Pattern:
The bubble texture comes from placing bobbles in a staggered grid. On bobble rows, you work a bobble, then skip a stitch, then single crochet. The next bobble row offsets by one stitch, creating that honeycomb effect you see in the photo.
Ribbing:
The cuffs and neckband use rows of single crochet worked in the back loop only. This creates vertical ridges that stretch and recover, just like knit ribbing.
Pink Bubble Stitch Baby Romper Pattern
This romper is worked in pieces and seamed. We will make the back panel, front panels (left and right for the button band), sleeves, and legs separately.
Back Panel
Foundation: With 4.0mm hook, ch 42.
Row 1 (WS): Sc in 2nd ch from hook and in each ch across. Turn. (41 sts)
Row 2 (RS): Ch 1, sc in first st, *bob in next st, skip next st, sc in next st, sc in next st*, repeat from * to * across. Turn. (41 sts, 10 bobbles)
Row 3: Ch 1, sc in each st across. Turn. (41 sts)
Row 4: Ch 1, sc in first 3 sts, *bob in next st, skip next st, sc in next st, sc in next st*, repeat from * to * to last 2 sts, sc in last 2 sts. Turn. (41 sts, 9 bobbles)
Row 5: Ch 1, sc in each st across. Turn. (41 sts)
Repeat Rows 2 through 5 for pattern. Continue until piece measures 10 inches from beginning, ending on a WS row.
Armhole Shaping:
Next Row (RS): Sl st in first 4 sts, ch 1, work in pattern across to last 4 sts, leave remaining sts unworked. Turn. (33 sts)
Continue in pattern for 4 more inches.
Shoulder Shaping:
Next Row: Work across first 8 sts in pattern. Fasten off. Skip center 17 sts, join yarn, work across remaining 8 sts. Fasten off.
Right Front Panel
Foundation: With 4.0mm hook, ch 24.
Row 1 (WS): Sc in 2nd ch from hook and in each ch across. Turn. (23 sts)
Work in bobble pattern same as back until piece measures 10 inches.
Armhole Shaping:
Next Row (RS): Sl st in first 4 sts, ch 1, work in pattern across. Turn. (19 sts)
Continue in pattern for 3 inches.
Neck Shaping:
Next Row (RS): Work in pattern to last 6 sts, leave remaining sts unworked. Turn. (13 sts)
Next Row: Sc2tog, work in pattern across. Turn. (12 sts)
Repeat decrease row 4 more times. (8 sts)
Work even until armhole measures 4 inches. Fasten off.
Left Front Panel
Work same as Right Front, reversing all shaping.
Button Band (Right Front)
With 3.5mm hook, join yarn at bottom edge of right front.
Row 1: Work 50 sc evenly along front edge. Turn.
Rows 2 through 4: Ch 1, sc in BLO of each st across. Turn.
Fasten off.
Buttonhole Band (Left Front)
Row 1: Work 50 sc evenly along front edge. Turn.
Row 2: Ch 1, sc in BLO of each st across. Turn.
Row 3 (Buttonhole Row): Ch 1, sc in BLO of first 3 sts, *ch 2, skip 2 sts, sc in BLO of next 6 sts*, repeat from * to * 5 more times, sc in remaining sts. Turn. (6 buttonholes)
Row 4: Ch 1, sc in BLO of each st and 2 sc in each ch-2 space across. Turn.
Fasten off.
Sleeves (Make 2)
Foundation: With 4.0mm hook, ch 32.
Row 1: Sc in 2nd ch from hook and in each ch across. Turn. (31 sts)
Work in bobble pattern for 5 inches.
Cap Shaping:
Sl st in first 4 sts, work in pattern to last 4 sts, leave remaining unworked. Turn. (23 sts)
Decrease 1 st each side every RS row 4 times. (15 sts)
Fasten off.
Cuff Ribbing:
With 3.5mm hook, ch 6.
Row 1: Sc in 2nd ch from hook and in each ch across. Turn. (5 sts)
Rows 2 through 26: Ch 1, sc in BLO of each st across. Turn.
Fasten off. Sew short ends together to form ring. Sew to sleeve bottom.
Legs (Make 2)
Foundation: With 4.0mm hook, ch 36.
Row 1: Sc in 2nd ch from hook and in each ch across. Turn. (35 sts)
Work in bobble pattern for 6 inches.
Crotch Shaping:
Sl st in first 2 sts, work in pattern to last 2 sts, leave remaining unworked. Turn. (31 sts)
Continue for 2 more inches. Fasten off.
Ankle Ribbing:
Work same as sleeve cuff, but make 30 rows. Attach to leg bottom.
Assembly
1. Sew shoulder seams
2. Sew side seams from underarm to bottom of body
3. Set in sleeves, matching center of cap to shoulder seam
4. Sew inner leg seams
5. Attach legs to body at crotch
6. Sew buttons opposite buttonholes
Neckband
With 3.5mm hook, join yarn at right front neck edge.
Work 3 rounds of sc around neckline, decreasing at corners to keep flat. Fasten off.
Bubble Stitch Baby Bonnet Pattern
This sweet bonnet completes the set perfectly.
Crown:
With 4.0mm hook, ch 4, sl st to join.
Round 1: Ch 1, 8 sc in ring, sl st to join. (8 sts)
Round 2: Ch 1, 2 sc in each st around, sl st to join. (16 sts)
Round 3: Ch 1, *sc in next st, 2 sc in next st*, repeat around, sl st to join. (24 sts)
Round 4: Ch 1, *sc in next 2 sts, 2 sc in next st*, repeat around, sl st to join. (32 sts)
Continue increasing 8 sts per round until you have 56 sts.
Begin Bobble Pattern:
Work in rows (not rounds) for back of head shaping.
Row 1 (RS): Ch 1, sc in first 48 sts, turn leaving remaining 8 sts unworked.
Row 2: Ch 1, sc across. Turn. (48 sts)
Row 3: Ch 1, sc, *bob, skip 1, sc, sc*, repeat across. Turn.
Continue bobble pattern for 3 inches.
Face Edging:
With 3.5mm hook, work 3 rows sc in BLO around face opening.
Ties:
Ch 60. Sc in 2nd ch from hook and each ch across. Fasten off. Make 2. Attach at corners of face opening.
Matching Baby Booties Crochet Pattern
These tiny booties work up in under an hour each.
Sole:
With 4.0mm hook, ch 10.
Round 1: Sc in 2nd ch from hook, sc in next 7 ch, 3 sc in last ch. Working along opposite side of chain, sc in next 7 sts, 2 sc in last st, sl st to join. (20 sts)
Round 2: Ch 1, 2 sc in first st, sc in next 7 sts, 2 sc in each of next 3 sts, sc in next 7 sts, 2 sc in each of next 2 sts, sl st to join. (26 sts)
Round 3: Ch 1, sc in first st, 2 sc in next st, sc in next 7 sts, *sc, 2 sc in next st* 3 times, sc in next 7 sts, *sc, 2 sc in next st* twice, sl st to join. (32 sts)
Sides:
Rounds 4 through 6: Ch 1, sc in BLO around, sl st to join. (32 sts)
Instep Shaping:
Round 7: Ch 1, sc in first 10 sts, sc2tog 6 times, sc in remaining 10 sts, sl st to join. (26 sts)
Round 8: Ch 1, sc in first 8 sts, sc2tog 5 times, sc in remaining 8 sts, sl st to join. (21 sts)
Cuff:
Rounds 9 through 12: Ch 1, sc in first st, *bob, skip 1, sc, sc*, repeat around adjusting as needed, sl st to join.
Ribbed Top:
Ch 6. Work rows of sc in BLO for 20 rows. Sew to top of bootie. Fasten off.
Finishing Tips
Blocking: Wet block all pieces before assembly. This evens out your bobbles and makes seaming much easier. Lay flat on a towel, pat into shape, let dry completely.
Weaving Ends: You will have many ends from color joins and piece beginnings. Weave each end through at least 6 stitches on the wrong side, splitting the yarn plies if possible for extra security.
Button Placement: Sew buttons through both layers of the button band for extra durability. Babies pull on everything.
You Did It
This Pink Bubble Stitch Baby Romper Set crochet pattern is truly special. The bobble texture, the coordinating pieces, those heart buttons. Someone is going to treasure this for years.
I hope these step by step instructions helped you create something beautiful. If you made this set, I would absolutely love to see it. Tag me on Instagram or share in our Facebook group. Seeing your finished projects is genuinely the best part of my day.
Thank you for trusting me with your time and yarn. Now go wrap a baby in all that handmade love.
Happy crocheting, friend.