Oh, this bag. I cannot tell you how many compliments I get when I carry this little beauty out into the world. This crescent moon handbag combines textured bobble stitches with elegant gold hardware for a result that looks absolutely boutique-worthy. And here is the best part. If you can crochet basic stitches and follow a rhythm, you can absolutely make this.
This crochet pattern walks you through every single step. We are talking detailed row instructions, stitch counts, finishing techniques, and all my tips for getting that professional look. The construction is simpler than it appears. You will work flat panels, add gorgeous texture with bobble stitches, then assemble everything with a ring handle and optional chain strap.
Let me show you exactly how to make your own.
Why This Crochet Handbag Pattern Works So Well
The crescent moon shape is naturally flattering and surprisingly practical. It sits beautifully against your hip when you use the crossbody chain. The curved silhouette holds more than you would expect. Phone, wallet, keys, lipstick, sunglasses. All tucked away in style.
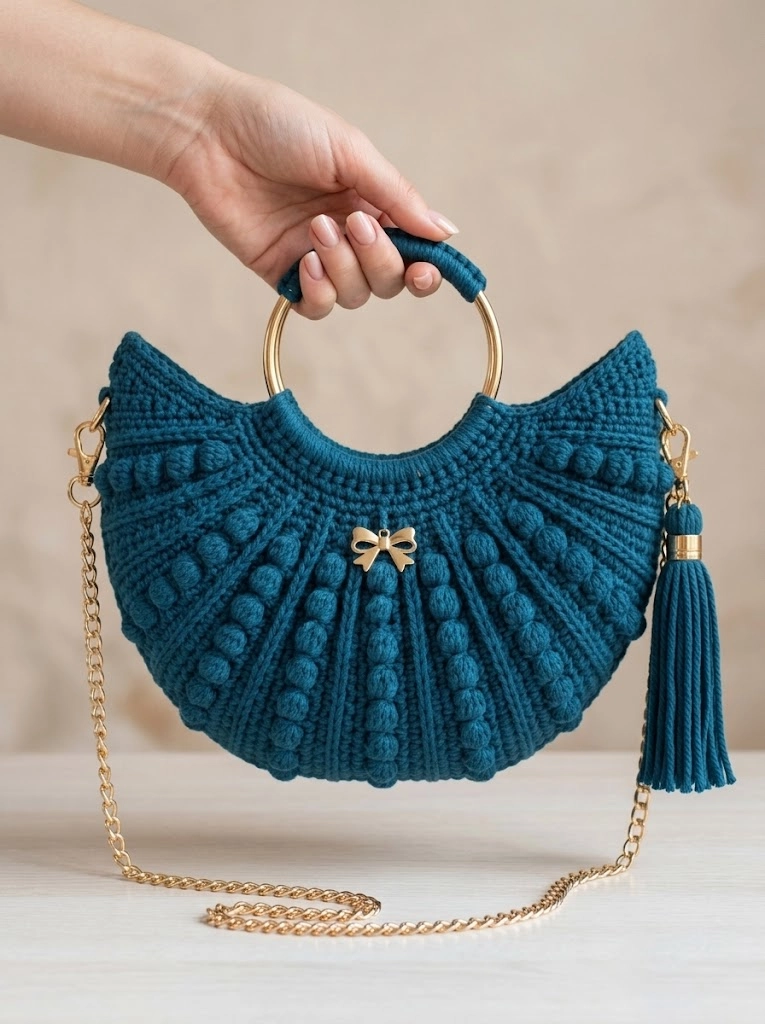
The bobble stitch texture adds visual interest without being fussy. Those little dimensional pops catch light and create shadows that make the whole piece look expensive. Paired with gold hardware, this bag reads as designer.
I designed this crochet tutorial with intermediate crocheters in mind, but adventurous beginners can absolutely tackle it. If you know how to single crochet, double crochet, and are willing to learn the bobble stitch, you have everything you need.
Materials You Will Need
Gathering your supplies before you start makes everything flow smoothly. Here is your complete list.
Yarn:
- 200 grams of worsted weight cotton yarn or cotton blend
- I recommend mercerized cotton for that beautiful sheen you see in the photos
- Color shown is a deep teal or peacock blue
Hook:
- 4.0mm crochet hook (US size G/6)
- Adjust if needed to match gauge
Hardware:
- One pair of metal ring handles, approximately 12cm (4.7 inches) diameter
- Gold tone recommended
- Two D-ring clasps or swivel lobster clasps
- Gold chain strap, approximately 120cm (47 inches)
- Optional: decorative label or bow charm
Notions:
- Tapestry needle
- Stitch markers
- Scissors
- Measuring tape
Gauge:
16 stitches and 18 rows = 4 inches in single crochet
Take time to check your gauge. A bag that is too loose will stretch and lose shape.
Stitch Abbreviations and Definitions
Let me break down every stitch before we start. No confusion allowed.
Chain (ch): The foundation loop. Yarn over, pull through the loop on your hook. Think of it as building a little ladder.
Slip Stitch (sl st): Insert hook, yarn over, pull through both the stitch and the loop on your hook in one motion. Used for joining and moving across stitches invisibly.
Single Crochet (sc): Insert hook into stitch, yarn over and pull up a loop (2 loops on hook), yarn over and pull through both loops. Your basic, tight, sturdy stitch.
Double Crochet (dc): Yarn over first, insert hook into stitch, yarn over and pull up a loop (3 loops on hook), yarn over and pull through 2 loops, yarn over and pull through remaining 2 loops. Taller than single crochet.
Bobble Stitch (bob): This creates those dimensional bumps. Work 5 double crochets into the same stitch, but stop each dc before the final pull-through. You will have 6 loops on your hook. Yarn over and pull through all 6 loops at once. The bobble pops to the back of your work, so keep your right side facing you.
Increase (inc): Work 2 stitches into one stitch. Adds width.
Decrease (dec): Work 2 stitches together as one. Removes width.
How to Crochet the Crescent Moon Handbag Step by Step
This bag is constructed in several pieces: two identical body panels, a bottom gusset, and then assembled with the ring handle. Follow along carefully.
Body Panel (Make 2)
The body panels create that beautiful crescent shape with radiating texture lines and bobble accents.
Foundation Row:
Ch 51.
Row 1 (Right Side): Sc in 2nd ch from hook and in each ch across. (50 sts)
Row 2: Ch 1, turn. Sc in each st across. (50 sts)
Row 3: Ch 1, turn. Sc in first 4 sts, *bob in next st, sc in next 4 sts* repeat from * across. (50 sts, 9 bobbles)
Row 4: Ch 1, turn. Sc in each st across. (50 sts)
Row 5: Ch 1, turn. Sc in each st across. (50 sts)
Row 6: Ch 1, turn. Sc in first 2 sts, *bob in next st, sc in next 4 sts* repeat from * to last 3 sts, bob in next st, sc in last 2 sts. (50 sts, 10 bobbles)
This creates the offset bobble pattern you see in the design. The bobbles stagger rather than stack directly above each other.
Rows 7 through 10: Repeat Rows 3 through 6.
Rows 11 through 14: Repeat Rows 3 through 6.
Row 15: Ch 1, turn. Sc in each st across. (50 sts)
Row 16 (Begin Decreases): Ch 1, turn. Sc2tog, sc in each st to last 2 sts, sc2tog. (48 sts)
Row 17: Ch 1, turn. Sc in each st across. (48 sts)
Row 18: Ch 1, turn. Sc2tog, sc in each st to last 2 sts, sc2tog. (46 sts)
Continue this decrease pattern every other row until you have 30 sts remaining. This creates the curved upper edge.
Final Rows:
Work 2 rows even in sc on remaining 30 sts.
Fasten off. Weave in ends.
You should have a panel that measures approximately 12 inches wide at the bottom, 7 inches wide at the top, and 8 inches tall.
Bottom Gusset
The gusset adds depth and structure to your bag.
Foundation: Ch 11.
Row 1: Sc in 2nd ch from hook and each ch across. (10 sts)
Rows 2 through 80: Ch 1, turn. Sc in each st across. (10 sts)
This creates a strip approximately 2.5 inches wide and 18 inches long. Adjust length as needed to fit around the curved bottom of your panels.
Ring Handle Attachment Panel (Make 2)
These small panels wrap around the ring handle and attach to the bag body.
Foundation: Ch 9.
Row 1: Sc in 2nd ch from hook and each ch across. (8 sts)
Rows 2 through 20: Ch 1, turn. Sc in each st across. (8 sts)
Fasten off, leaving a long tail for sewing.
Assembly Instructions
Now comes the satisfying part. Bringing it all together.
Step 1: Join Body Panels to Gusset
Pin the gusset strip around the curved bottom edge of one body panel, right sides facing out. Use a tapestry needle and matching yarn to whip stitch the pieces together. Work slowly around the curve.
Repeat on the other side with the second body panel.
Your bag should now have dimension and stand on its own.
Step 2: Wrap the Ring Handle
This is the detail that elevates everything. Take your remaining yarn and tightly wrap the top portion of each ring handle.
Start by tying the yarn to the ring. Wrap snugly, keeping wraps parallel and tight against each other. Cover approximately one third to one half of the ring. Secure the end by weaving it under several wraps with your tapestry needle.
The unwrapped gold portion peeks out on either side for that mixed-material look.
Step 3: Attach Handle Panels
Fold each handle attachment panel in half lengthwise, wrong sides together. Slip the folded panel around the wrapped portion of the ring handle.
Position the raw ends at the top center of each body panel. Whip stitch or single crochet through all layers to secure firmly.
Step 4: Add Hardware
Attach D-ring clasps or swivel clasps to each upper corner of the bag. You can sew these directly through the crocheted fabric or add small fabric tabs for extra security.
Thread your chain strap through the clasps. Adjust length as desired.
Step 5: Add Tassel (Optional)
Cut 40 strands of yarn, each 12 inches long. Fold in half. Wrap another strand tightly around the top portion, about an inch from the fold. Secure with a knot.
Trim the bottom evenly. Attach to one corner clasp for that extra flourish.
Step 6: Add Decorative Elements (Optional)
The sample shows a small bow charm and a “Handmade” label on the front. These attach easily with jump rings or can be sewn directly to the fabric. Totally optional but adds a professional touch.
Tips for Success
Block your panels. Wet blocking your finished panels before assembly makes a huge difference. They will be more uniform and easier to sew together.
Use a smaller hook for the gusset. If your gusset seems loose, drop down half a hook size. You want firm, stable fabric that holds structure.
Match your bobble tension. Practice bobble stitches on a swatch first. They should all pop to the same size. Consistency matters here.
Invest in quality hardware. Cheap gold plating rubs off quickly. Look for solid brass or high-quality plated hardware. Your future self will thank you.
Line your bag. This is optional but recommended. A fabric lining protects your belongings and adds polish. Cut lining fabric slightly smaller than your bag interior, hem the edges, and hand stitch inside.
Customization Ideas
This step by step crochet pattern adapts beautifully to your personal style.
Try rich jewel tones for fall. Soft pastels for spring. Crisp white or cream for summer. Black with silver hardware for evening.
Swap the chain strap for a braided crochet strap if you prefer all-fiber construction.
Add an interior pocket by crocheting a small rectangle and stitching it inside before assembly.
Use chunky yarn and a larger hook for a bigger market bag version.
Skill Level and Time Estimate
I rate this beginner friendly for confident beginners and comfortable for intermediate crocheters. The hardest technique is the bobble stitch, and honestly, once you get into the rhythm, it becomes meditative.
Plan for approximately 8 to 12 hours of work depending on your speed. I finished mine over a weekend of relaxed crafting with plenty of coffee breaks.
Final Thoughts on This Crescent Moon Handbag Crochet Pattern
Making this bag feels special. Every row adds to something beautiful. When you clip on that chain strap and swing it over your shoulder, you will feel like you made something truly remarkable. Because you did.
I hope this crochet tutorial gives you everything you need to create your own version. Please do not hesitate to read through the instructions twice before starting. Print them out. Highlight the tricky bits. Take your time.
Thank you so much for trusting me with your crafting hours. I know how precious time is, and I am genuinely honored you chose to spend some of it here with me.
When you finish your bag, I would absolutely love to see it. Tag me on Instagram or share in my Facebook group. Seeing your creations is hands down the best part of this whole journey.
Now go grab your hook and let’s make something gorgeous.
Happy crocheting, friend.