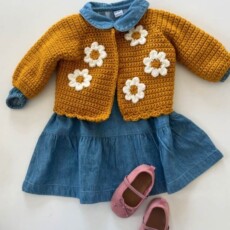
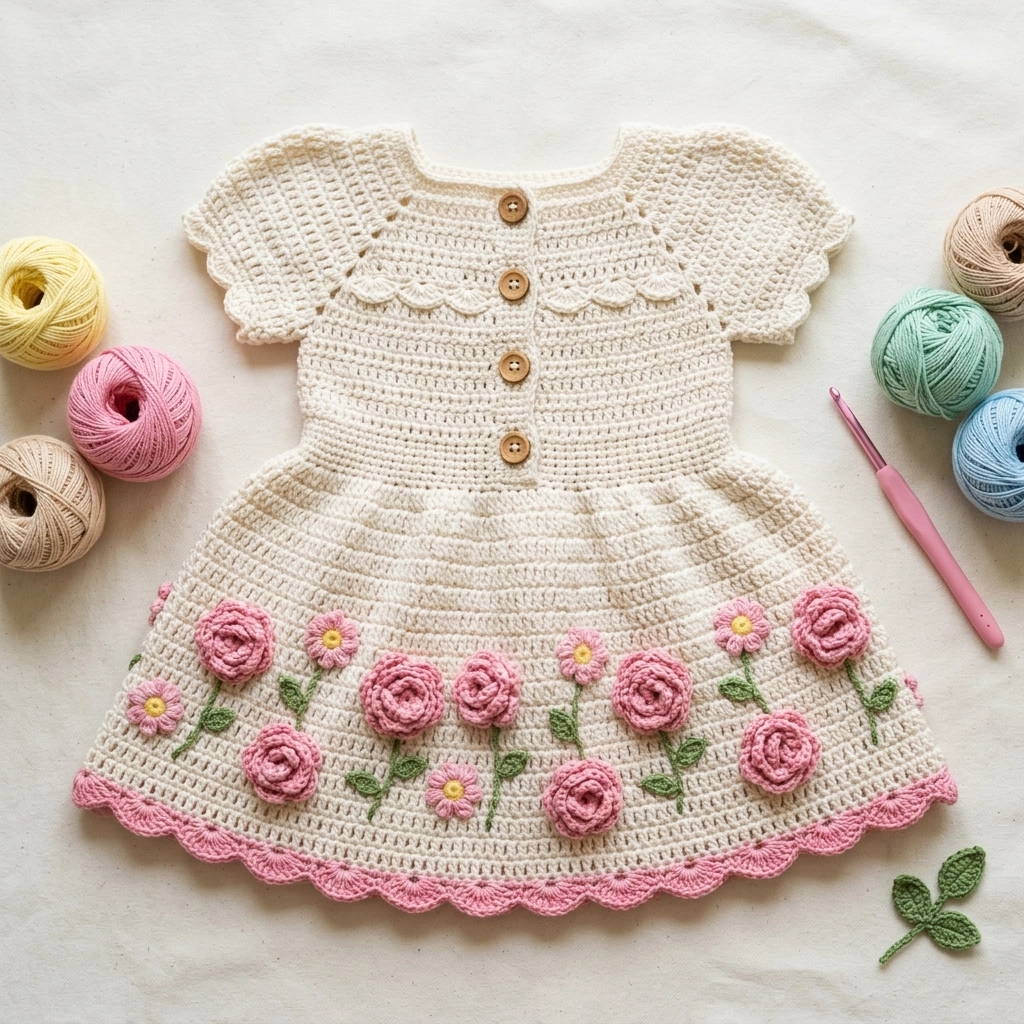
There is something absolutely magical about tiny crocheted dresses. This Floral Garden Baby Dress has been one of my most requested patterns, and I completely understand why. The cream bodice paired with those sweet dimensional roses and daisies along the hem creates a dress that looks like it belongs in a storybook garden. The best part? This crochet pattern is more approachable than it looks.
If you can work basic stitches in rows and rounds, you can absolutely make this dress. The flowers are added separately after the main dress is complete. That means no complicated colorwork while you are building the garment. You will construct each piece individually, then bring everything together at the end.
Let me walk you through exactly how I made this beauty.
Why This Baby Dress Crochet Pattern Works So Well
This design uses a top-down construction method. You start at the neckline and work your way down to the hem. This approach lets you try the dress on your little one as you go. Need it longer? Just add more rows to the skirt. The button placket runs down the center front, making diaper changes so much easier.
The bodice features clean rows of half double crochet that create a lovely subtle texture. The short sleeves have a charming scalloped edge that adds femininity without extra bulk. The skirt flares naturally from the waist, giving that classic A-line silhouette that looks adorable on every baby.
Those dimensional flowers along the bottom? They are worked separately and sewn on. This step-by-step approach means you can take your time perfecting each element before assembly.
Materials You Will Need
Yarn:
- Main Color (MC): Cream or off-white, approximately 200 grams
- Color A: Pink, approximately 30 grams (for roses and hem edging)
- Color B: Yellow, approximately 10 grams (for daisy centers)
- Color C: Green, approximately 20 grams (for leaves and stems)
Yarn Weight: DK weight (weight category 3). I recommend a soft cotton blend for breathability and easy care. Look for something machine washable since this is baby wear.
Hook Size: 4.0mm (G/6) for main dress, 3.5mm (E/4) for flowers and details
Notions:
- 4 wooden buttons, approximately 12mm diameter
- Tapestry needle for weaving ends and sewing
- Stitch markers
- Scissors
- Measuring tape
Gauge: 16 stitches and 12 rows = 4 inches in half double crochet with 4.0mm hook
Always check your gauge before starting. A dress that is too tight will not fit comfortably, and one that is too loose loses its shape.
Size Information
This pattern is written for size 6-12 months.
Finished Measurements:
- Chest: approximately 18 inches
- Length from shoulder to hem: approximately 14 inches
- Sleeve length: approximately 3 inches
Abbreviations and Stitch Definitions
Let me break down every stitch you will use. If you are newer to crochet, read through this section before starting.
Ch = Chain. Wrap yarn over hook, pull through loop on hook. This creates the foundation for most crochet work.
Sl st = Slip stitch. Insert hook, yarn over, pull through both the stitch and the loop on your hook in one motion. Used for joining and moving across stitches without adding height.
Sc = Single crochet. Insert hook, yarn over, pull up a loop (2 loops on hook), yarn over, pull through both loops. This is your shortest basic stitch.
Hdc = Half double crochet. Yarn over, insert hook, yarn over, pull up a loop (3 loops on hook), yarn over, pull through all 3 loops. This stitch has a nice drape and works up quickly.
Dc = Double crochet. Yarn over, insert hook, yarn over, pull up a loop (3 loops on hook), yarn over, pull through 2 loops, yarn over, pull through remaining 2 loops. Taller than hdc with more openness.
Inc = Increase. Work 2 stitches into the same stitch. This adds width.
Sk = Skip. Pass over the indicated stitch without working into it.
St(s) = Stitch(es)
Rep = Repeat
The Floral Garden Baby Dress Crochet Tutorial
Part 1: Yoke (Worked Flat)
The yoke is the top portion that shapes around the neckline and shoulders. We work this flat in rows to create the button placket opening.
Foundation Row: With MC and 4.0mm hook, ch 62.
Row 1: Hdc in 3rd ch from hook (skipped chains count as first hdc), hdc in each ch across. Turn. (60 sts)
Row 2: Ch 2 (counts as first hdc throughout), hdc in next 8 sts, 2 hdc in next st (this marks your first increase for sleeve shaping), place marker, hdc in next 10 sts, 2 hdc in next st, place marker, hdc in next 18 sts (this is the back), 2 hdc in next st, place marker, hdc in next 10 sts, 2 hdc in next st, place marker, hdc in last 9 sts. Turn. (64 sts)
The markers indicate your raglan increase points. You will work increases at these same 4 points every row to shape the sleeves and body.
Row 3: Ch 2, hdc in each st to 1 st before marker, 2 hdc in next st, slip marker, 2 hdc in next st, *rep from * at each marker, hdc in each st to end. Turn. (72 sts)
Rows 4-10: Repeat Row 3. Each row adds 8 stitches total. (Row 10: 128 sts)
Your yoke should measure approximately 3.5 inches from the foundation chain.
Part 2: Separate Sleeves and Join Body
This is where the magic happens. We will set aside the sleeve stitches and join the front and back to continue the bodice.
Row 11: Ch 2, hdc in next 17 sts (front), ch 4, sk next 30 sts (first sleeve), hdc in next 34 sts (back), ch 4, sk next 30 sts (second sleeve), hdc in last 17 sts (front). Turn. (68 body sts + 8 ch = 76 sts)
Do not worry about those skipped sleeve stitches. We will come back to them later.
Rows 12-16: Ch 2, hdc in each st across, including working into the chain stitches from Row 11. Turn. (76 sts)
Part 3: Waist and Skirt
Now we transition to the skirt. This is where the dress starts to flare out.
Row 17 (Increase Row): Ch 2, *hdc in next 3 sts, 2 hdc in next st*, rep from * across, ending with hdc in remaining sts. Turn. (95 sts)
Rows 18-20: Ch 2, hdc in each st across. Turn. (95 sts)
Row 21 (Increase Row): Ch 2, *hdc in next 4 sts, 2 hdc in next st*, rep from * across. Turn. (114 sts)
Rows 22-35: Ch 2, hdc in each st across. Turn. (114 sts)
Your skirt should now measure approximately 6-7 inches from the waist join.
Part 4: Scalloped Hem Border
Switch to Color A (pink) for this decorative edging. This creates that beautiful scalloped finish you see along the bottom.
Row 36: With Color A, ch 1, sc in first st, *sk 2 sts, 5 dc in next st (shell made), sk 2 sts, sc in next st*, rep from * across. Fasten off. (19 shells)
The shells create those lovely curves along the hem. Take your time here. Consistent tension makes these shells look professional.
Part 5: Sleeves
Now let us go back to those 30 stitches we skipped earlier.
With right side facing, join MC at the underarm.
Round 1: Ch 2, hdc in each of the 30 sleeve sts, hdc 2 sts into the ch-4 underarm space, sl st to join. (32 sts)
Rounds 2-5: Ch 2, hdc in each st around, sl st to join. (32 sts)
Round 6 (Scallop Edge): Ch 1, sc in first st, *sk 1 st, 3 dc in next st, sk 1 st, sc in next st*, rep from * around, sl st to join. Fasten off.
Repeat for second sleeve.
Part 6: Neckline Edging
With MC, join yarn at top right corner of neckline (where buttons will go).
Round 1: Ch 1, work sc evenly around entire neckline opening, working 3 sc in each corner. Sl st to join.
Round 2: Ch 1, *sc in next 2 sts, sk 1 st, 3 dc in next st, sk 1 st*, rep from * around for scallop edge. Sl st to join. Fasten off.
Part 7: Button Band
Right Front (Buttonhole Side):
Join MC at bottom of right front opening.
Work 24 sc evenly up the front edge.
Row 2: Ch 1, sc in first 2 sts, *ch 2, sk 2 sts (buttonhole made), sc in next 4 sts*, rep from * 3 more times, sc to end. Fasten off.
Left Front:
Work 24 sc evenly along left front edge (no buttonholes needed here).
Making the Dimensional Flowers
These appliqués bring the whole dress to life. Take your time with these. They are small, so they work up quickly.
Rolled Roses (Make 6)
With Color A and 3.5mm hook:
Ch 30.
Row 1: Dc in 4th ch from hook, 2 dc in each ch across. (54 dc)
Fasten off, leaving a long tail. Starting from the beginning of the row, roll the strip tightly, stitching through the bottom edge every few turns to secure. The natural curl of the double crochets creates the rose shape.
Simple Daisies (Make 4)
With Color B (yellow), make a magic ring.
Round 1: Ch 1, 6 sc into ring, sl st to join. Fasten off Color B.
Join Color A (pink).
Round 2: *Ch 4, sl st in same st, sl st in next st*, rep from * around. (6 petals)
Fasten off.
Leaves (Make 12-14)
With Color C (green):
Ch 8.
Row 1: Sl st in 2nd ch from hook, sc in next ch, hdc in next ch, dc in next 2 ch, hdc in next ch, 3 sc in last ch.
Working along opposite side of foundation chain: hdc in next ch, dc in next 2 ch, hdc in next ch, sc in next ch, sl st in last ch. Fasten off.
Assembly and Finishing
Lay your dress flat on a clean surface. Arrange the roses and daisies along the lower portion of the skirt, spacing them approximately 2 inches apart. I like to alternate between roses and daisies for visual interest.
Using your tapestry needle and matching yarn, sew each flower securely in place. Add leaves at varying angles around the flowers. Some leaves can peek out from behind the flowers, others can stand alone.
For the stems, you can either chain stitch directly onto the dress fabric or use simple embroidery stitches with green yarn.
Sew on your four buttons opposite the buttonholes.
Weave in all ends thoroughly. Baby clothes get washed frequently, so secure those tails well.
Block gently if needed by laying flat and steaming lightly. Do not press directly on the dimensional flowers.
Pattern Notes and Tips
Tension matters here. The bodice should have a slight stretch but hold its shape. If your gauge is off, try going up or down a hook size.
The button placket can be tricky. Make sure your buttonholes align with your buttons before sewing them on permanently.
For the flowers, do not stress about perfection. Handmade means each rose will look slightly different, and that is part of the charm.
Washing instructions: Machine wash cold on gentle cycle, lay flat to dry. The dimensional flowers hold up well but can flatten slightly in a dryer.
Wrapping Up This Crochet Pattern
Making this Floral Garden Baby Dress is one of those projects that feels like a labor of love from start to finish. Every rolled rose, every tiny leaf, every carefully placed shell stitch adds up to something truly special. This is the kind of handmade gift that gets saved in memory boxes and pulled out for photographs decades later.
I hope this step-by-step crochet tutorial gives you everything you need to create your own version. Take your time with it. Enjoy the process. And when you finish, please tag me on Instagram or share in our Facebook group. Seeing your creations honestly makes my entire week.
Thank you for trusting me with your time and your yarn stash. Happy crocheting, friend.