These squishy little snake friends are about to become your new favorite project. I made four of them in one weekend and honestly could not stop. They work up so fast, feel incredibly satisfying to stuff, and make the cutest gifts for kids and adults alike.
If you can crochet in the round and know how to increase and decrease, you can absolutely make these plush snakes. The construction is beautifully simple. One continuous tube that starts at the nose, widens for the head, stays consistent through the body, and tapers to a tiny tail. No sewing pieces together. No complicated shaping. Just rhythmic, meditative stitching.
Let me walk you through everything you need to create your own adorable snake family.
Why This Plush Snake Crochet Pattern Works So Well
The genius of this crochet snake pattern is the yarn choice. These snakes are made with chenille yarn, sometimes called velvet yarn or blanket yarn. That plush, velvety texture makes them irresistibly soft and gives them that professional stuffed animal look without any extra effort on your part.
The stitch definition with chenille yarn is subtle, which actually works in your favor here. Any minor imperfections disappear into that fluffy texture. This makes it a wonderfully forgiving project if you are newer to amigurumi or working with bulky yarn.
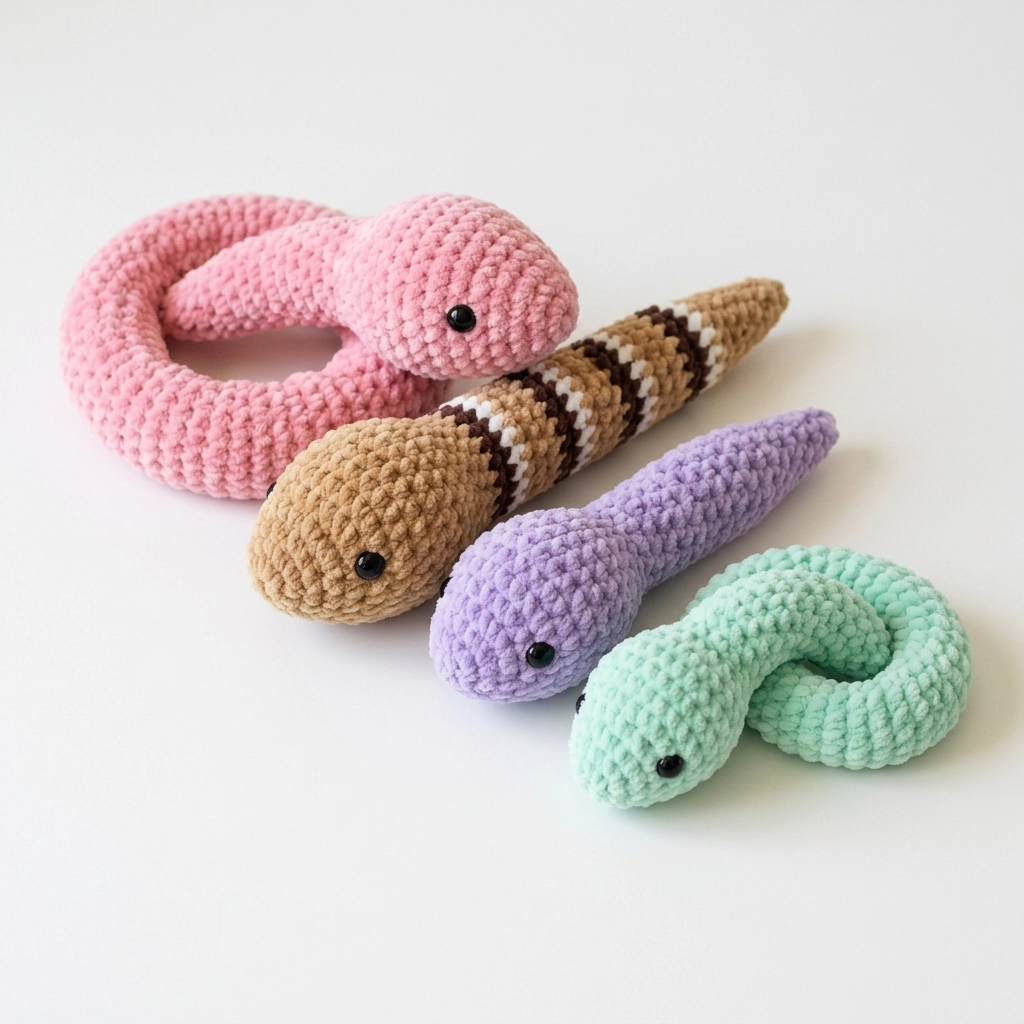
I made four snakes for this tutorial in pink, tan with stripes, lavender, and mint green. The solid colored versions take about two hours each. The striped version takes a bit longer because of the color changes, but I will show you exactly how to do those clean stripes if you want to try them.
Materials You Will Need
Before we start, gather everything so you can work uninterrupted. There is nothing worse than getting into a groove and realizing you are missing something.
Yarn:
- Chenille or velvet yarn in your chosen color (approximately 80 to 100 grams per snake)
- For striped version: main color plus two contrast colors for the stripe sections
I recommend yarns like Bernat Blanket, Himalaya Dolphin Baby, or YarnArt Dolce. These are all super bulky weight yarns, sometimes labeled as weight 6 on the skein. The finished snakes in the photos measure approximately 16 to 18 inches long for the larger ones and 10 to 12 inches for the smaller version.
Hook:
- 6.0mm crochet hook (US size J/10)
You may need to adjust your hook size depending on your tension. The goal is a tight enough fabric that stuffing will not poke through, but not so tight that your hand cramps. If you see gaps between stitches, go down a hook size.
Notions:
- 6mm black safety eyes (one pair per snake)
- Polyester fiberfill stuffing
- Stitch marker (a scrap of contrasting yarn works fine)
- Yarn needle for weaving ends
Stitches and Abbreviations
Let me define every stitch before we begin. Even if you know these well, a quick refresher never hurts.
Magic Ring (MR): An adjustable starting loop that pulls completely closed. You wrap yarn around your fingers, pull up a loop, chain one, then work your stitches into that ring. When you pull the tail, the center hole disappears. This is essential for amigurumi so you do not have a gap at the tip of the nose.
Chain (ch): The foundation stitch. Yarn over, pull through the loop on your hook. One chain made.
Single Crochet (sc): Insert hook into the stitch, yarn over and pull up a loop (two loops on hook), yarn over and pull through both loops. One single crochet completed. This is your main stitch for the entire snake.
Increase (inc): Work two single crochet stitches into the same stitch. This adds one stitch to your count. If a round has 6 stitches and you increase in each one, you end with 12 stitches.
Decrease (dec): Also called an invisible decrease in amigurumi. Insert your hook through the front loops only of the next two stitches, yarn over and pull through both front loops, yarn over and pull through both loops on hook. This removes one stitch and keeps the fabric smooth.
Slip Stitch (sl st): Insert hook, yarn over, pull through the stitch and the loop on your hook in one motion. Used for joining or creating a flat finish.
Understanding the Construction
This snake is worked in continuous rounds. That means you do not join at the end of each round or chain up to start a new one. You just keep spiraling around and around.
This is why your stitch marker is so important. Move it up to the first stitch of each new round so you always know where you are. With chenille yarn especially, it can be tricky to see where rounds begin and end.
The shape goes like this:
1. Tiny nose point (starting small)
2. Head section (increases to full width)
3. Long body tube (consistent stitch count)
4. Tail section (decreases back to a point)
You will stuff as you go rather than all at the end. This gives you better control over the firmness and prevents that frustrating moment of trying to push stuffing through a tiny opening.
Step by Step Crochet Pattern for Plush Snake
The Nose and Head
Round 1: Make a magic ring. Work 6 sc into the ring. Pull tail to close. Place stitch marker in first stitch. (6 sts)
Round 2: Inc in each st around. (12 sts)
Round 3: *Sc 1, inc* repeat around. (18 sts)
Round 4: *Sc 2, inc* repeat around. (24 sts)
Round 5: *Sc 3, inc* repeat around. (30 sts)
Rounds 6 through 10: Sc in each st around. (30 sts) — This creates the rounded head shape.
Now is the time to attach your safety eyes. Place them between rounds 7 and 8, spacing them about 8 to 10 stitches apart. The exact placement depends on the expression you want. Closer together looks cuter and more cartoonish. Further apart looks more realistic.
Push the post through from the outside, then secure the washer on the inside. Make sure it clicks firmly. Safety eyes cannot be removed once the washer is on, so take a moment to check your placement before committing.
After eyes are secured, begin stuffing the head. Fill it firmly but not stretched tight. You want a nice squishy feel.
Transition to Body
Round 11: *Sc 3, dec* repeat around. (24 sts)
Rounds 12 through 14: Sc in each st around. (24 sts)
The head is now complete. You have a nicely rounded shape that narrows slightly into the neck area.
The Body Section
This is the relaxing part. Just keep going around and around.
Rounds 15 through 60: Sc in each st around. (24 sts)
Yes, that is 45 rounds of the same thing. Put on a podcast, watch a show, enjoy the rhythm. This is meditative crochet at its best.
Add stuffing every 10 to 15 rounds. Do not wait until the end. Push small amounts of fiberfill down into the tube as you work. Use the eraser end of a pencil or a chopstick to help distribute it evenly.
For a longer snake, simply work more body rounds. For the smaller snakes in the photo, I worked only 35 to 40 body rounds. Adjust to your preference.
Creating Stripes (Optional)
For the striped tan snake in the photo, I added contrast stripes in the body section. Here is how to do it cleanly.
Work in your main color until you want a stripe. On the last yarn over of the stitch before your stripe, pull through with your new color instead. This seats the new color correctly.
Work 2 to 3 rounds in your stripe color, then switch back the same way. Carry the unused yarn loosely along the inside, or cut and rejoin if you prefer no floats.
The tan snake has brown and white stripes alternating in a pattern. You can do any combination you like. Rainbow snakes are adorable too.
The Tail
Time to taper down to a cute little tail point.
Round 61: *Sc 2, dec* repeat around. (18 sts)
Rounds 62 and 63: Sc in each st around. (18 sts)
Round 64: *Sc 1, dec* repeat around. (12 sts)
Rounds 65 and 66: Sc in each st around. (12 sts)
Add more stuffing now. The tail should feel as firm as the body.
Round 67: Dec around. (6 sts)
Round 68: Sc in each st around. (6 sts)
Round 69: Dec 3 times. (3 sts)
Add a tiny bit more stuffing to the very tip.
Cut yarn leaving a 6 inch tail. Thread through your yarn needle and weave through the front loops of the remaining 3 stitches. Pull tight to close. Weave the end back through the body several times to secure, then trim close.
Finishing Your Plush Snake
Weave in your starting tail from the magic ring by threading it through several stitches inside the head. The stuffing will hide any ends.
Give your snake a gentle squeeze all over to distribute the stuffing evenly. If any areas feel lumpy or sparse, you can massage the fiberfill around from the outside.
That is it. Your snake is complete.
Tips for Best Results
Tension matters with chenille yarn. It splits easily and can be slippery. Work a bit tighter than you would with regular yarn. If you find yourself frustrated, try a hook with a more tapered head rather than an inline style.
Count your stitches every few rounds. Chenille yarn makes it hard to see individual stitches clearly. A quick count keeps you on track and prevents that sinking feeling of realizing you dropped stitches twenty rounds ago.
Use a stitch marker religiously. I cannot emphasize this enough. Continuous rounds plus fuzzy yarn equals easy confusion. Your marker is your best friend here.
Stuff as you go. Seriously. It makes such a difference in the final feel of your snake. Trying to stuff a long narrow tube from one end is an exercise in frustration.
Make It Your Own
These snakes are endlessly customizable. Try different eye sizes for different expressions. Add a small forked tongue with red embroidery thread. Use self striping yarn for an easy multicolored effect without any color changes.
You could also embroider little nostrils, add felt spots, or use eyelash yarn for a fuzzy texture. Each snake can have its own personality.
The solid pastel versions are sweet and simple. The striped version has more visual interest. Both are absolutely adorable and hugely squishable.
Thank You for Making With Me
I really hope you enjoy making your own plush snake friends. This crochet pattern has become one of my favorites to revisit because the results are always so satisfying and the process is genuinely relaxing.
If you make one, I would love to see it. Share your finished snake on Instagram or Facebook and tag me. Seeing your creations honestly makes my whole day. Every color combination, every slight variation, every proud finished object photo brings me so much joy.
Happy crocheting, friend. Go make something squishy.