There’s something truly magical about crocheting your own dragon. This cream dragon plushie sits about 10 inches tall and features the sweetest details. Soft blue horns, expressive safety eyes, colorful tail pom poms, and tiny embroidered nostrils give this little guy so much personality. If you can work single crochet in the round, you can absolutely make this dragon crochet pattern.
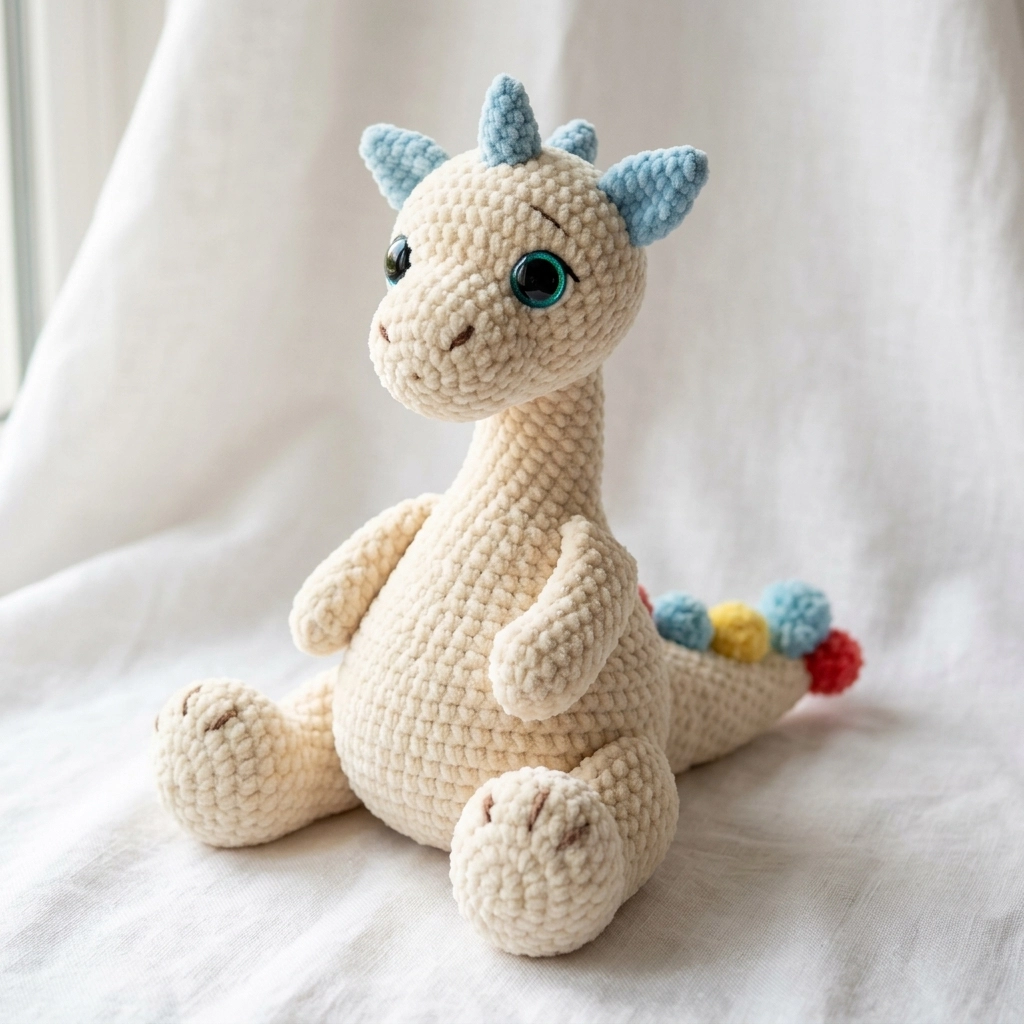
I designed this cuddly creature using plush chenille yarn, which gives that irresistibly squishy texture you see in the photos. The construction is straightforward. You’ll make each piece separately, then assemble everything at the end. Don’t let the multiple parts intimidate you. Each component uses basic amigurumi techniques that I’ll walk you through step by step.
Why You’ll Love This Dragon Crochet Tutorial
This dragon plushie makes an incredible gift for kids, fantasy lovers, or anyone who appreciates handmade toys. The neutral cream body works beautifully with any accent color. I chose soft blue for the horns and ears, but you could easily swap in purple, mint, or rainbow tones.
The sitting position means your dragon stays upright without a wire armature. The chunky yarn works up quickly too. Most crafters finish this project in a weekend. That instant gratification feels wonderful after longer projects.
Skill level: Intermediate beginner. You should be comfortable with the magic ring, single crochet, increases, and decreases. I’ll explain each technique as we go.
Materials You’ll Need
Yarn:
- Cream or off-white plush chenille yarn, approximately 200 grams (I recommend Bernat Blanket yarn or similar)
- Light blue plush chenille yarn, approximately 30 grams for horns and ears
- Small amounts of red, yellow, and blue yarn for tail pom poms
Hook:
- 5.0mm crochet hook (adjust if needed to achieve tight stitches with no stuffing showing)
Notions:
- 15mm safety eyes in teal or green
- Polyester fiberfill stuffing
- Yarn needle for sewing
- Brown embroidery thread for nostrils and paw pad details
- Stitch marker
- Scissors
Gauge: Gauge isn’t critical for amigurumi, but your stitches should be tight enough that stuffing doesn’t peek through. If you see white fluff between stitches, go down a hook size.
Abbreviations and Stitch Definitions
Let me explain every stitch before we begin. Reference this section whenever you need a refresher.
MR – Magic Ring: A adjustable loop that closes completely, perfect for starting amigurumi pieces. You wrap yarn around your fingers, pull up a loop, then work stitches into the ring before pulling it tight.
ch – Chain: Wrap yarn over hook, pull through loop on hook. Creates foundation or turning chains.
sc – Single Crochet: Insert hook into stitch, yarn over, pull up a loop (two loops on hook), yarn over, pull through both loops. This is your main stitch throughout.
inc – Increase: Work two single crochet stitches into the same stitch. This adds one stitch to your total. If a row says “sc, inc” and you have 6 stitches, you’ll end with 9.
dec – Invisible Decrease: Insert hook through front loops only of the next two stitches, yarn over, pull through both front loops, yarn over, pull through both loops on hook. This creates a neater decrease than the standard method.
sl st – Slip Stitch: Insert hook, yarn over, pull through stitch and loop on hook in one motion. Used for joining or creating surface details.
FO – Fasten Off: Cut yarn leaving a tail, pull through final loop, tighten.
How to Crochet the Dragon Body
The body is worked in continuous rounds. Don’t join at the end of each round. Use a stitch marker to track your first stitch.
Round 1: MR, 6 sc into ring, pull tight (6 sts)
Round 2: Inc in each st around (12 sts)
Round 3: *Sc, inc* repeat around (18 sts)
Round 4: *Sc 2, inc* repeat around (24 sts)
Round 5: *Sc 3, inc* repeat around (30 sts)
Round 6: *Sc 4, inc* repeat around (36 sts)
Round 7: *Sc 5, inc* repeat around (42 sts)
Rounds 8 to 14: Sc in each st around (42 sts) – 7 rounds total
This creates the rounded bottom portion of the body. Now we’ll begin shaping the torso.
Round 15: *Sc 5, dec* repeat around (36 sts)
Rounds 16 to 18: Sc in each st around (36 sts)
Round 19: *Sc 4, dec* repeat around (30 sts)
Rounds 20 to 24: Sc in each st around (30 sts)
Begin stuffing the body firmly at this point. Continue adding stuffing as you work.
Round 25: *Sc 3, dec* repeat around (24 sts)
Rounds 26 to 28: Sc in each st around (24 sts)
Round 29: *Sc 2, dec* repeat around (18 sts)
Rounds 30 to 32: Sc in each st around (18 sts)
Stuff the upper body firmly. FO, leaving a long tail for sewing to the head later.
How to Crochet the Dragon Head
The head attaches to the body at a slight forward angle, giving that adorable curious expression.
Round 1: MR, 6 sc into ring (6 sts)
Round 2: Inc in each st around (12 sts)
Round 3: *Sc, inc* repeat around (18 sts)
Round 4: *Sc 2, inc* repeat around (24 sts)
Round 5: *Sc 3, inc* repeat around (30 sts)
Round 6: *Sc 4, inc* repeat around (36 sts)
Round 7: *Sc 5, inc* repeat around (42 sts)
Rounds 8 to 16: Sc in each st around (42 sts) – 9 rounds total
Install safety eyes between rounds 10 and 11, approximately 8 stitches apart. The eyes in my dragon are positioned slightly toward the front of the face. Take your time with placement. I like to use pins first to test different positions.
Round 17: *Sc 5, dec* repeat around (36 sts)
Round 18: *Sc 4, dec* repeat around (30 sts)
Round 19: *Sc 3, dec* repeat around (24 sts)
Begin stuffing the head very firmly. A well-stuffed head gives your dragon better posture.
Round 20: *Sc 2, dec* repeat around (18 sts)
Round 21: *Sc, dec* repeat around (12 sts)
Finish stuffing. FO, leaving a long tail. Use the yarn needle to weave through the front loops of the remaining 12 stitches, pull tight to close.
Snout
The snout gives your dragon that sweet, slightly rounded nose area.
Round 1: MR, 6 sc into ring (6 sts)
Round 2: Inc in each st around (12 sts)
Round 3: *Sc, inc* repeat around (18 sts)
Rounds 4 to 6: Sc in each st around (18 sts)
FO, leaving a long tail. Stuff lightly. The snout attaches below and between the eyes.
Horns (Make 2, Blue Yarn)
Switch to your light blue yarn for the horns. These give your dragon that classic fantasy look.
Round 1: MR, 4 sc into ring (4 sts)
Round 2: *Sc, inc* repeat around (6 sts)
Round 3: Sc in each st around (6 sts)
Round 4: *Sc, inc* repeat around (9 sts)
Round 5: Sc in each st around (9 sts)
Round 6: *Sc 2, inc* repeat around (12 sts)
Rounds 7 to 8: Sc in each st around (12 sts)
FO, leaving a tail for sewing. Stuff lightly. The horns attach to the top of the head, angled slightly outward and backward.
Ears (Make 2, Blue Yarn)
These pointed ears frame your dragon’s face beautifully.
Round 1: MR, 4 sc into ring (4 sts)
Round 2: Inc in each st around (8 sts)
Round 3: *Sc, inc* repeat around (12 sts)
Rounds 4 to 5: Sc in each st around (12 sts)
FO, leaving a tail. Flatten the opening without stuffing. Attach ears beside the horns, pointed outward.
Arms (Make 2)
Round 1: MR, 6 sc into ring (6 sts)
Round 2: Inc in each st around (12 sts)
Round 3: *Sc, inc* repeat around (18 sts)
Rounds 4 to 6: Sc in each st around (18 sts)
Round 7: *Sc, dec* repeat around (12 sts)
Rounds 8 to 14: Sc in each st around (12 sts)
FO, stuff the hand portion firmly, leave the upper arm portion lightly stuffed for flexibility. Leave a long tail for attachment.
Legs (Make 2)
The legs are worked with rounded feet for that sitting position.
Round 1: MR, 6 sc into ring (6 sts)
Round 2: Inc in each st around (12 sts)
Round 3: *Sc, inc* repeat around (18 sts)
Round 4: *Sc 2, inc* repeat around (24 sts)
Rounds 5 to 8: Sc in each st around (24 sts)
Round 9: Sc 6, dec 6 times, sc 6 (18 sts)
Round 10: Sc 6, dec 3 times, sc 6 (15 sts)
Rounds 11 to 16: Sc in each st around (15 sts)
Stuff the foot firmly. Leave leg portion medium stuffed. FO with long tail.
Tail
Round 1: MR, 6 sc into ring (6 sts)
Round 2: Sc in each st around (6 sts)
Round 3: *Sc, inc* repeat around (9 sts)
Rounds 4 to 6: Sc in each st around (9 sts)
Round 7: *Sc 2, inc* repeat around (12 sts)
Rounds 8 to 12: Sc in each st around (12 sts)
Round 13: *Sc 3, inc* repeat around (15 sts)
Rounds 14 to 20: Sc in each st around (15 sts)
FO, stuff lightly to keep the tail flexible and poseable. Make small pom poms in red, yellow, and blue to attach along the tail’s upper edge.
Assembly Instructions
Take your time with assembly. This step transforms separate pieces into your finished dragon plushie.
1. Attach snout to the head below and between the eyes. Sew all around the edge.
2. Embroider nostrils using brown embroidery thread. Two small angled lines on the snout front.
3. Attach horns to the top center of the head, angled backward.
4. Attach ears on either side of the horns, positioned slightly lower.
5. Sew head to body at a slight forward angle. This gives your dragon personality.
6. Attach arms to the upper body sides. Position them so the dragon appears to be holding them forward.
7. Attach legs at the front lower body. Angle them outward to create the sitting position.
8. Attach tail at the lower back. Curve it around to one side.
9. Add pom poms along the top of the tail using small yarn balls or purchased pom poms.
10. Embroider paw details with brown thread. Simple lines suggest toe divisions.
Tips for Success with This Crochet Pattern
Yarn choice matters. Plush chenille yarn creates that huggable texture, but it can be tricky to see your stitches. Work in good lighting and use a stitch marker religiously.
Tight tension is essential. Amigurumi requires firm stitches to prevent stuffing from showing through.
Safety eyes go in before closing. Once you start decreasing significantly, you can’t add them. Ask me how I learned this lesson.
Stuff as you go. It’s much easier to achieve good stuffing when you add fiberfill section by section rather than trying to stuff a nearly-closed piece.
Final Thoughts on Your Dragon Plushie
Congratulations on making it through this beginner friendly crochet tutorial. Your cream dragon plushie is going to bring so much joy. Whether it becomes a nursery decoration, a child’s companion, or a gift for a fellow fantasy fan, you’ve created something truly special with your own hands.
I absolutely love seeing finished projects from this pattern. If you share your dragon on Instagram or Facebook, please tag me. Seeing your color choices and personal touches honestly makes my whole week brighter.
Thank you for trusting me with your crafting time. Now go give that dragon a squeeze. You’ve earned it.
Happy crocheting, friend.