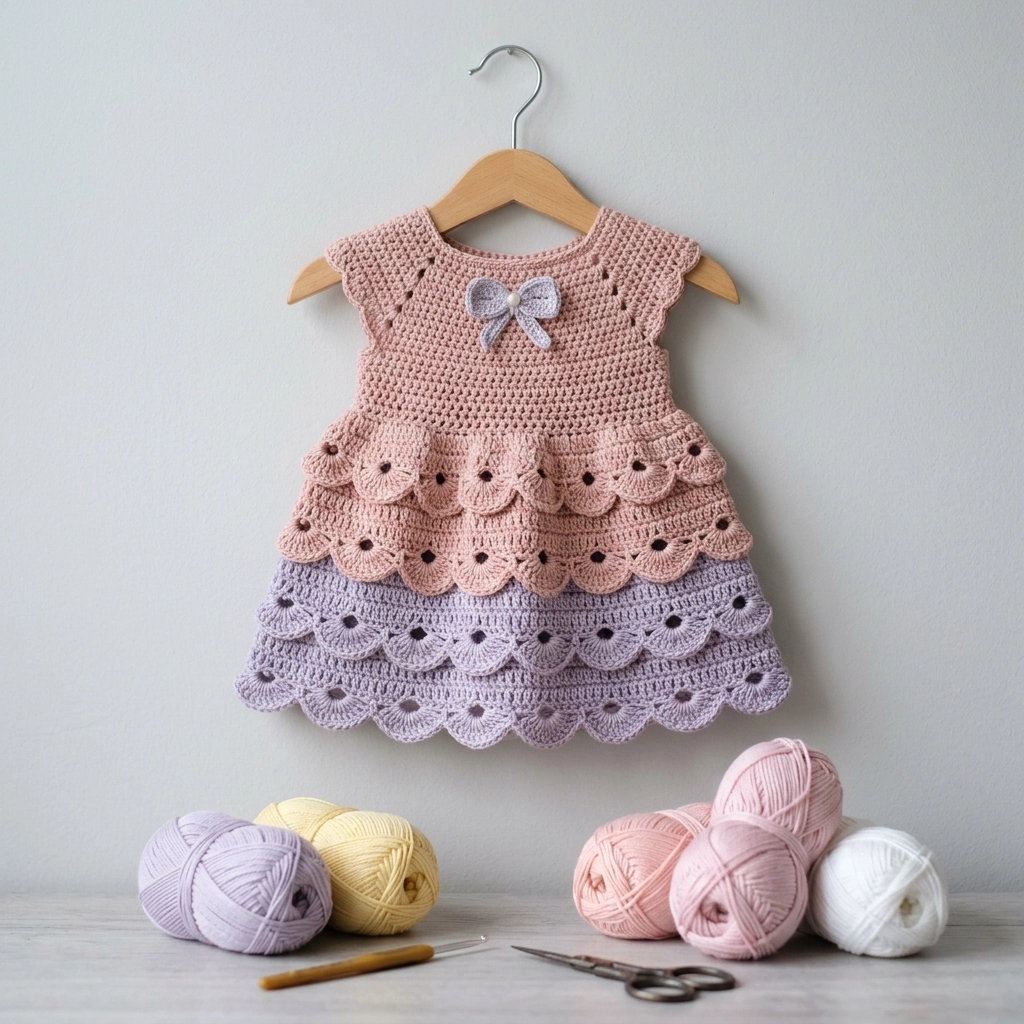
There’s something absolutely magical about crocheting tiny garments. This tiered ruffle baby dress has become one of my most treasured makes. The layered scallop skirt creates that dreamy, twirly effect every little one deserves. And here’s the best part. This crochet pattern looks far more complicated than it actually is.
If you can work basic stitches and follow a simple repeat, you can absolutely make this dress. I promise.
The construction is straightforward. You’ll start with a fitted bodice worked from the top down. Then you’ll add those gorgeous ruffled tiers one at a time. The color blocking between the dusty rose and soft lavender gives it that boutique baby shop look. But you made it with your own hands.
Let me walk you through everything you need to recreate this sweet little dress from scratch.
Why This Baby Dress Crochet Pattern Works So Well
This design hits the sweet spot between impressive and achievable. The shell stitch creates those beautiful scalloped edges without requiring any advanced techniques. Each tier builds on the one before it. So once you understand the rhythm, the rest flows naturally.
The fitted bodice uses simple increases to shape around tiny shoulders. The eyelet detail adds visual interest while keeping the fabric breathable. Perfect for warm weather or layering over a onesie.
I designed the proportions for a 6 to 12 month size. The slight A-line shape through the skirt means it fits comfortably over a diaper. Always important.
Materials You Will Need
Gather these supplies before you start. Having everything ready makes the process so much smoother.
Yarn:
- Sport weight yarn (size 2) in two colors
- Color A (dusty rose/blush): approximately 150 yards
- Color B (soft lavender): approximately 100 yards
- Small amount of Color C (light gray or white) for the bow accent
I recommend 100% cotton or a cotton blend for baby garments. Cotton breathes well, washes easily, and softens with each wash. Look for yarns labeled baby safe or tested for harmful substances.
Hook:
- 3.5mm (US E/4) crochet hook
- Adjust if needed to match gauge
Notions:
- Tapestry needle for weaving ends
- Stitch markers (at least 4)
- Small scissors
- One small button or pearl bead for bow center (optional)
- Measuring tape
Gauge and Finished Measurements
Gauge: 20 stitches and 10 rows = 4 inches in half double crochet
Always check your gauge before starting. This matters for fit. If your swatch measures larger, go down a hook size. Smaller? Go up a hook size.
Finished Size (6-12 months):
- Chest: 18 inches (relaxed)
- Length from shoulder to hem: 14 inches
- Bodice length: 5 inches
- Skirt length: 9 inches
Abbreviations and Stitch Definitions
Let me explain every stitch before we begin. No surprises.
ch = chain: Yarn over, pull through loop on hook. This creates the foundation and turning chains.
sl st = slip stitch: Insert hook, yarn over, pull through both the stitch and loop on hook in one motion. Used for joining rounds.
sc = single crochet: Insert hook, yarn over, pull up a loop (2 loops on hook), yarn over, pull through both loops.
hdc = half double crochet: Yarn over, insert hook, yarn over, pull up a loop (3 loops on hook), yarn over, pull through all 3 loops.
dc = double crochet: Yarn over, insert hook, yarn over, pull up a loop (3 loops on hook), yarn over, pull through 2 loops, yarn over, pull through remaining 2 loops.
sk = skip: Pass over the indicated stitch without working into it.
sp = space: The gap created by chains in the previous row.
shell = a group of stitches worked into the same stitch or space. For this pattern: 5 dc worked into one stitch.
inc = increase: Work 2 stitches into one stitch to add width.
Special Techniques
Magic Ring (Adjustable Loop): This creates a closed center for working in the round. Make a loop with your yarn, insert hook, pull up a loop, chain to secure, then work your first round stitches into the ring. Pull the tail tight to close the center.
If magic rings frustrate you, chain 4 and slip stitch to form a ring instead. Works just as well.
Working in the Round: You’ll work continuously around the piece without turning. Use a stitch marker to track the beginning of each round.
Joining Tiers: Each ruffle tier attaches to the tier above it. You’ll work into a designated row of the previous section.
Step by Step Crochet Pattern Instructions
Part 1: The Bodice
The bodice works from the neckline down to the waist. You’ll create the yoke first, then separate for armholes.
Starting Chain:
With Color A, ch 52. Join with sl st to first ch to form a ring, being careful not to twist.
Round 1: Ch 2 (counts as hdc throughout), hdc in each ch around. Join with sl st to top of beginning ch-2. (52 hdc)
Round 2: Ch 2, hdc in same st, hdc in next 4 sts, *2 hdc in next st, hdc in next 4 sts*, repeat * to * around. Join. (62 hdc)
Round 3: Ch 2, hdc in each st around. Join. (62 hdc)
Round 4 (Eyelet Round): Ch 3 (counts as dc), *ch 1, sk 1, dc in next st*, repeat * to * around, ending ch 1, sk 1. Join to top of ch-3. (31 dc, 31 ch-1 spaces)
This creates those small decorative holes you see on the bodice. They add texture without compromising structure.
Round 5: Ch 2, hdc in each dc and each ch-1 sp around. Join. (62 hdc)
Rounds 6-8: Ch 2, hdc in each st around. Join. (62 hdc)
Round 9 (Increase Round): Ch 2, *hdc in next 5 sts, 2 hdc in next st*, repeat * to * around. Join. (72 hdc)
Rounds 10-12: Ch 2, hdc in each st around. Join. (72 hdc)
Place a stitch marker. You’ve completed the yoke.
Dividing for Armholes
This is where we separate the front, back, and create sleeve openings.
Round 13: Ch 2, hdc in next 14 sts (front), ch 6, sk next 12 sts (armhole), hdc in next 18 sts (back), ch 6, sk next 12 sts (armhole), hdc in last 3 sts. Join. (36 hdc + 12 ch)
Round 14: Ch 2, hdc in each st and each ch around. Join. (48 hdc)
Rounds 15-18: Ch 2, hdc in each st around. Join. (48 hdc)
Round 19 (Increase for Skirt): Ch 2, *hdc in next 3 sts, 2 hdc in next st*, repeat * to * around. Join. (60 hdc)
Round 20: Ch 2, hdc in each st around. Join. (60 hdc)
Fasten off. Weave in ends. The bodice is complete.
Part 2: First Ruffle Tier (Color A)
Now for the fun part. Each tier creates those gorgeous layered scallops.
Join Color A to any stitch of Round 20.
Round 1: Ch 1, sc in same st, *sk 2 sts, 5 dc in next st (shell made), sk 2 sts, sc in next st*, repeat * to * around. Join to first sc. (10 shells, 10 sc)
Round 2: Ch 3, 2 dc in same st (half shell), *sc in center dc of shell below, 5 dc in next sc*, repeat * to * around, ending with 2 dc in first st. Join to top of ch-3. (10 shells)
Round 3: Ch 1, sc in same st, *5 dc in next sc, sc in center dc of shell*, repeat * to * around. Join. (10 shells)
Rounds 4-5: Repeat Rounds 2 and 3.
Round 6: Ch 1, sc in same st, *ch 1, 5 dc in next sc, ch 1, sc in center dc of shell*, repeat * to * around. Join.
Fasten off Color A.
Part 3: Second Ruffle Tier (Color A)
This tier begins one round below where the first tier started.
Join Color A to Round 19 of the bodice (work behind the first tier).
Rounds 1-6: Repeat the shell pattern from First Ruffle Tier.
Fasten off.
Part 4: Third Ruffle Tier (Color B)
Here’s where the color changes. The lavender section begins.
Join Color B to Round 18 of the bodice.
Rounds 1-6: Repeat the shell pattern instructions.
Rounds 7-8: Continue the shell pattern for 2 additional rounds to extend this tier.
Fasten off.
Part 5: Fourth Ruffle Tier and Hem (Color B)
This final tier creates the bottom edge of the dress.
Join Color B to Round 17 of the bodice.
Rounds 1-8: Repeat shell pattern.
Round 9 (Scallop Edge): Ch 1, sc in first st, *ch 2, 7 dc in center of shell, ch 2, sc in next sc*, repeat * to * around. Join.
Fasten off. Weave in all ends.
Part 6: Bow Accent
Using Color C (gray or white):
Ch 25.
Row 1: Sc in 2nd ch from hook and each ch across. (24 sc)
Rows 2-6: Ch 1, turn, sc in each st across. (24 sc)
Fasten off leaving a long tail.
Pinch the center of the rectangle and wrap yarn around several times to create the bow shape. Secure with a few stitches. Attach a small pearl bead to the center if desired.
Sew the bow to the center front of the bodice, just below the neckline.
Finishing Your Baby Dress
Weave in all remaining yarn tails. I use a tapestry needle and weave through at least 2 inches of stitches, then double back. This prevents ends from popping out after washing.
Blocking: Wet block your dress for the best results. Soak in lukewarm water for 15 minutes. Gently squeeze out excess water (don’t wring). Lay flat on a towel and pin the ruffles into shape. Let dry completely.
The tiers will bloom beautifully after blocking. Trust the process.
Helpful Tips for Success
Tension matters. Keep your stitches consistent throughout. Tight stitches on the bodice are fine. They create structure. But loosen up slightly on the ruffles so they drape nicely.
Count your stitches. At the end of each round, verify your stitch count matches what’s listed. Catching mistakes early saves heartache later.
Use stitch markers generously. Mark the beginning of rounds, the center front, and the center back. These reference points help you stay oriented.
Don’t stress about perfection. Handmade items have character. Small variations are normal and expected.
Caring for the Finished Dress
Hand wash in cool water with gentle detergent. Lay flat to dry. Cotton may shrink slightly in the dryer, so air drying is safest.
Store folded rather than hanging to prevent stretching.
You Did It
I hope this tiered ruffle baby dress crochet pattern brings you as much joy to make as it brought me. There’s nothing quite like gifting a handmade garment to a little one. These are the pieces that become treasured keepsakes.
Thank you so much for choosing to make this with me. I genuinely appreciate you being here.
If you make this dress, I would absolutely love to see it. Tag me on Instagram or share in our Facebook group. Seeing your finished projects honestly makes my whole day.
Happy crocheting, friend. You’ve got this.