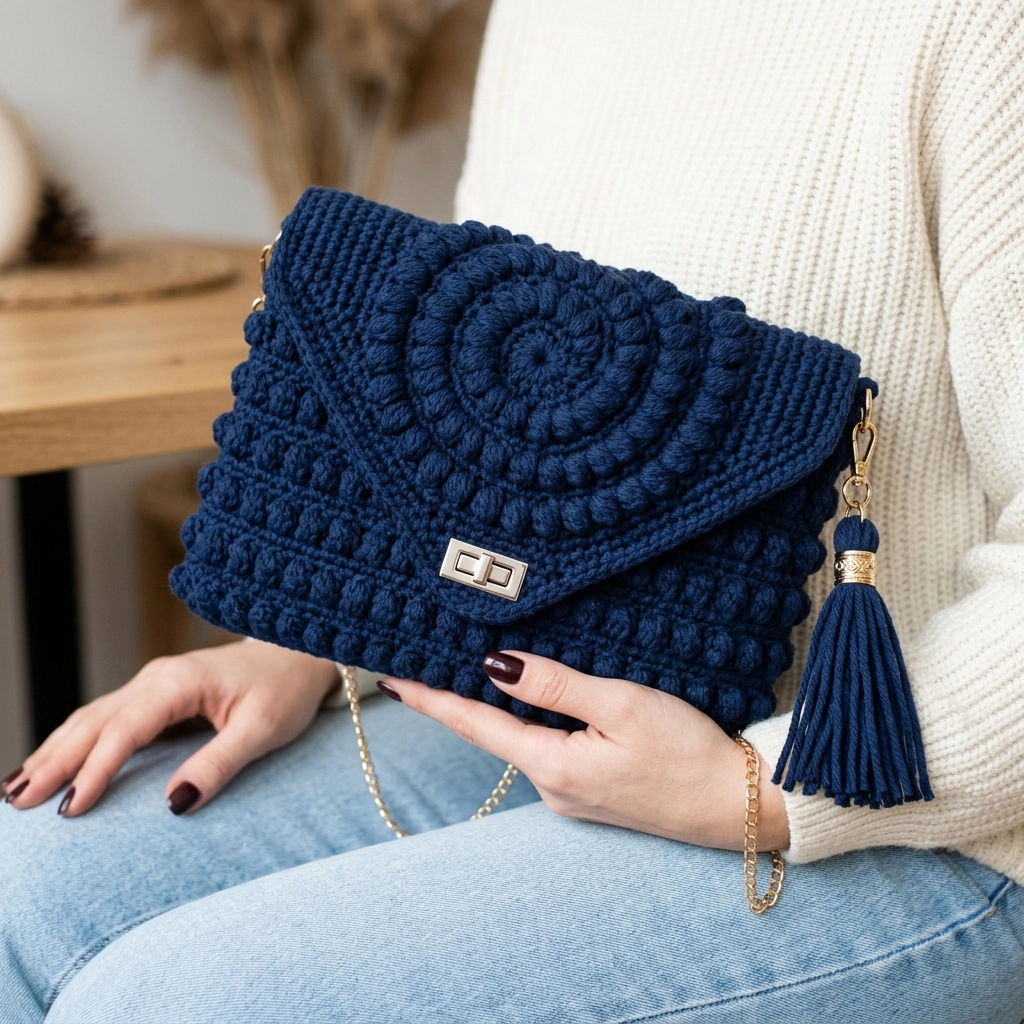
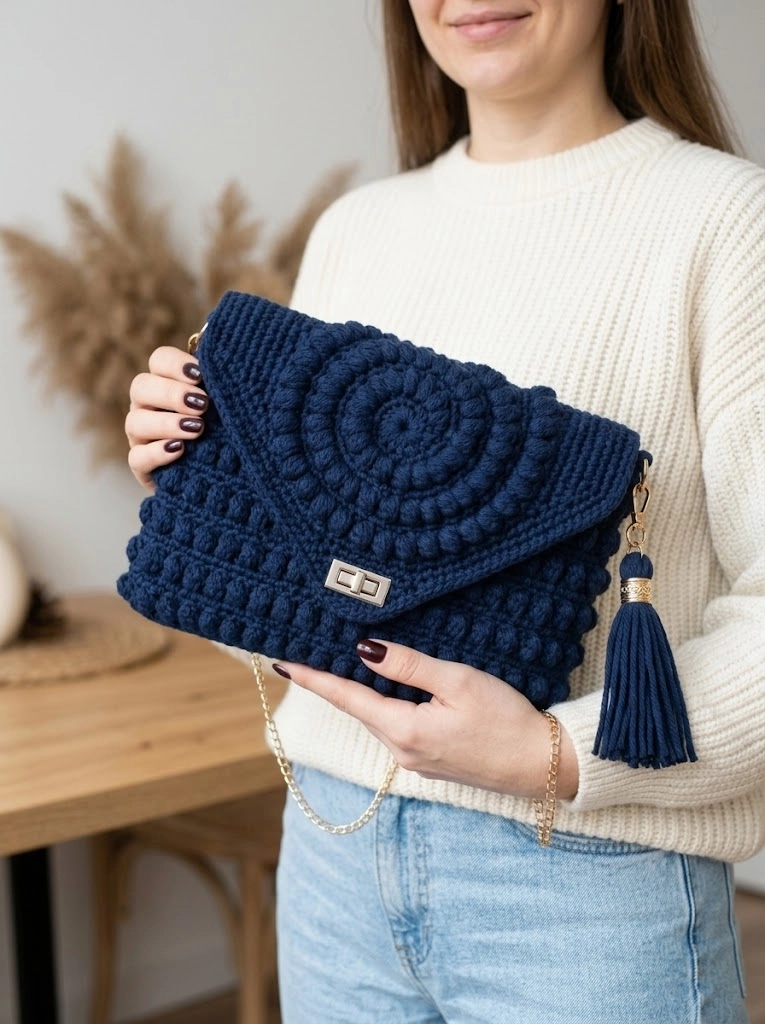
This gorgeous navy blue clutch bag is the kind of project that looks way more advanced than it actually is. Trust me on this one. The stunning spiral design on the flap, the textured bobble stitches across the body, and that polished turn-lock clasp come together for a bag that could easily pass for a high-end boutique piece. And you can make it yourself.
If you can work in the round and you know how to make a bobble stitch, you already have most of the skills you need. This is a solid intermediate project that an adventurous beginner could absolutely tackle.
Let me walk you through every single step of this crochet clutch bag pattern. By the end, you will have a beautiful handmade accessory that pairs perfectly with jeans or a little black dress.
Why This Spiral Clutch Bag Pattern Works So Well
The magic of this design comes from combining two very different textures. The flap features a spiral motif worked in the round, creating that hypnotic swirl effect with radiating bobbles. The bag body uses rows of bobble stitches arranged in a clean geometric pattern against a single crochet background.
The contrast between the circular flap and the structured rectangular body gives this clutch its designer look. Add in a gold chain strap, a matching tassel, and a professional turn-lock clasp, and you have got a bag people will not believe you made yourself.
Materials You Will Need
Gathering your supplies before you start makes everything smoother. Here is what I used for this crochet clutch tutorial:
Yarn:
- Approximately 200 grams of worsted weight cotton yarn in navy blue
- Cotton or cotton blend works best for structure
- I recommend a yarn with tight twist for clean stitch definition
Hook:
- 4.0mm crochet hook (US G/6)
- Adjust if your tension runs loose or tight
Notions:
- Turn-lock clasp (also called twist lock or bag closure)
- Gold chain strap, approximately 120cm
- 2 D-rings or swivel clips for strap attachment
- Tapestry needle for weaving ends
- Stitch markers
- Fabric lining (optional but recommended)
- Matching thread and sewing needle for lining
Finished Dimensions:
- Approximately 25cm wide x 18cm tall (10 inches x 7 inches)
- Flap extends about 10cm over the front
Skill Level and Techniques
This pattern is intermediate level. You should be comfortable with:
- Working in the round
- Working in rows
- Increasing stitches
- Bobble stitches
- Joining and fastening off
- Basic seaming
If you are newer to crochet, do not let the bobble stitches intimidate you. I will explain exactly how to make them. Once you get the rhythm, they become almost meditative.
Abbreviations and Stitch Definitions
Let me define every stitch before we begin. I will give you the full name, the abbreviation, and a plain English explanation.
Chain (ch): The foundation stitch. Yarn over, pull through the loop on your hook. Simple as that.
Slip Stitch (sl st): Insert hook, yarn over, pull through both loops at once. Used for joining rounds.
Single Crochet (sc): Insert hook, yarn over and pull up a loop (2 loops on hook), yarn over and pull through both loops. Your basic building block stitch.
Half Double Crochet (hdc): Yarn over, insert hook, yarn over and pull up a loop (3 loops on hook), yarn over and pull through all 3 loops. Slightly taller than single crochet.
Double Crochet (dc): Yarn over, insert hook, yarn over and pull up a loop (3 loops on hook), yarn over and pull through 2 loops, yarn over and pull through remaining 2 loops. Creates a taller, more open fabric.
Bobble Stitch (bob): Work 4 double crochets into the same stitch, but stop each one before the final pull through. You will have 5 loops on your hook. Yarn over and pull through all 5 loops at once. This creates a rounded bump that pops out from the fabric. The bobbles on this bag push toward the right side (the outside).
Increase (inc): Work 2 stitches into the same stitch. This adds one stitch to your count.
Magic Ring (MR): An adjustable starting loop for working in the round. You can substitute ch 4 and sl st to join if the magic ring frustrates you. Both methods work.
Gauge
Gauge matters for bags because you want a firm fabric that holds its shape.
10 sc x 10 rows = approximately 5cm x 5cm (2 inches x 2 inches)
If your fabric feels floppy, go down a hook size. If it feels stiff and hard to work, go up a hook size. You want firm but not rigid.
Step By Step Crochet Pattern Instructions
Now let us get into the actual pattern. I have broken this into sections: the spiral flap, the bag body, assembly, and finishing.
Part 1: The Spiral Flap
The flap is worked in the round from the center outward. The bobbles spiral out from the middle, creating that beautiful swirl effect you see in the photo.
Round 1: Make a magic ring. Ch 1 (does not count as a stitch). Work 6 sc into the ring. Sl st to first sc to join. Pull the ring closed. (6 sts)
Round 2: Ch 1. Work 2 sc in each st around. Sl st to join. (12 sts)
Round 3: Ch 1. *Sc in first st, 2 sc in next st.* Repeat from * around. Sl st to join. (18 sts)
Round 4: Ch 1. *Sc in next 2 sts, 2 sc in next st.* Repeat from * around. Sl st to join. (24 sts)
Round 5: Ch 1. *Sc in next 3 sts, 2 sc in next st.* Repeat from * around. Sl st to join. (30 sts)
Now we begin adding the spiral bobbles. This is where the magic happens.
Round 6: Ch 1. *Sc in next 3 sts, bob in next st, sc in next st, 2 sc in next st.* Repeat from * around, adjusting the final repeat as needed to maintain the spiral. Sl st to join. (36 sts)
Round 7: Ch 1. *Sc in next 4 sts, bob in next st (placing it one stitch offset from the previous round’s bobble), sc in next st, 2 sc in next st.* Repeat from * around. Sl st to join. (42 sts)
Continue this pattern, adding bobbles in a spiral formation. Each round, place your bobble one stitch further along than the previous round. This creates the curving spiral effect. Keep increasing at 6 evenly spaced points each round to maintain a flat circle.
Rounds 8 through 14: Continue the spiral bobble pattern with increases until your circle measures approximately 18cm (7 inches) in diameter. You should end with approximately 78 to 84 stitches, depending on your tension.
Final Flap Round: Work one round of sc with no increases, placing bobbles to complete the spiral design. Fasten off, leaving a long tail for seaming.
The outer edge should have a decorative bobble border. Work this as: *sc in next 2 sts, bob in next st.* Repeat around the entire edge.
Pro tip: Place a stitch marker at the start of each round. It is easy to lose your place when you are focusing on bobble placement.
Part 2: The Bag Body
The body is worked flat in rows, then folded and seamed. It uses a textured bobble pattern against a single crochet background.
Foundation: Ch 51.
Row 1: Sc in 2nd ch from hook and in each ch across. Turn. (50 sts)
Row 2: Ch 1. Sc in each st across. Turn. (50 sts)
Row 3: Ch 1. Sc in first 2 sts. *Bob in next st, sc in next 3 sts.* Repeat from * across, ending with bob in next st, sc in last 2 sts. Turn. (50 sts, with bobbles)
Row 4: Ch 1. Sc in each st across. Turn. (50 sts)
Row 5: Ch 1. Sc in each st across. Turn. (50 sts)
Row 6: Ch 1. Sc in first 4 sts. *Bob in next st, sc in next 3 sts.* Repeat from * across, ending with sc in last 2 sts. Turn. (50 sts, with offset bobbles)
This creates a brick-like offset bobble pattern. The bobbles in Row 6 fall between the bobbles in Row 3.
Rows 7 through 36: Repeat Rows 3 through 6 for the pattern. You will work approximately 36 rows total, or until your piece measures about 36cm (14 inches) long. This length allows the body to fold into a bag with proper proportions.
Tip: Count your stitches every few rows. It is so easy to accidentally skip the stitch right after a bobble.
Part 3: Assembly
Now comes the satisfying part where flat pieces become a bag.
Step 1: Fold the Body
Lay your finished body piece flat. Fold the bottom edge up approximately 18cm (7 inches). This creates the bag pocket. The remaining fabric becomes the back panel.
Step 2: Seam the Sides
Using a tapestry needle and matching yarn, whip stitch or mattress stitch both side seams closed. Work through both layers, creating a neat edge. Take your time here. Neat seams make a professional-looking bag.
Step 3: Attach the Flap
Position the spiral flap at the top back edge of the bag body. The center of the flap should align with the center back. Using the long tail from the flap, stitch securely along the straight edge where the back panel ends.
Step 4: Install Hardware
Mark the center front of the bag body for the bottom half of the turn-lock clasp. Mark the corresponding spot on the flap for the top half. Most turn-lock clasps require small slits cut or stitches parted to insert the prongs. Follow your specific clasp instructions.
Attach D-rings or swivel clips at each top corner of the bag for the chain strap. You can crochet small tabs to hold these, or sew them directly to the corner seams.
Part 4: Finishing Details
The Tassel:
Cut approximately 30 lengths of yarn, each about 25cm long. Fold them in half over a D-ring or jump ring. Wrap the top section tightly with yarn about 1cm down from the fold. Secure and trim evenly. Add a decorative bead or ring above the wrap if desired. Attach to the chain strap.
Lining (Optional but Recommended):
Cut two pieces of fabric to match your bag body dimensions plus 1cm seam allowance. Sew the lining with wrong sides together, leaving the top open. Insert into the bag body. Fold the top edge under and hand stitch to the inside of the bag just below the seam where the flap attaches.
Lining prevents items from catching in the stitches and gives the bag a more polished interior.
Blocking:
For cotton yarn, you can wet block your finished bag. Dampen it, reshape, and let dry flat. This evens out the stitches and helps the bobbles pop.
Tips for Success With This Crochet Clutch Pattern
Bobble consistency: Try to make each bobble the same size. Consistent tension on that final pull-through matters.
Keep it tight: A firm gauge prevents items from poking through. Do not be afraid to go down a hook size.
Push bobbles forward: As you work, push each bobble to the right side (the outside) of your work. They naturally want to pop toward you on the working side.
Count obsessively: I know it is tedious. But trust me, counting saves frogging.
Customization Ideas
This pattern works beautifully in other colors too. Imagine it in:
- Cream or ivory for summer weddings
- Black for evening events
- Dusty rose for spring
- Forest green for fall
You could also swap the chain strap for a crocheted strap, or skip the strap entirely for a true clutch style.
Wrapping Up Your Navy Blue Spiral Clutch Bag
You did it. You now have a complete step by step crochet pattern for a stunning spiral clutch bag that looks absolutely boutique worthy. The combination of the spiral flap and the textured bobble body creates visual interest without overwhelming complexity.
This beginner friendly crochet tutorial (okay, adventurous beginner friendly) gives you everything you need to create a bag you will be proud to carry. The construction is straightforward once you understand the pieces. And that spiral flap is such a satisfying make.
Thank you so much for choosing this pattern. I genuinely appreciate you trusting me to guide you through this project. It means more than you know.
I would absolutely love to see your finished clutch bag. Seriously, nothing makes my day like seeing your creations. Share your photos on Instagram or Facebook and tag me so I can admire your work. Seeing how you style your handmade bags is the best kind of inspiration.
Happy crocheting, friend. You have got this.