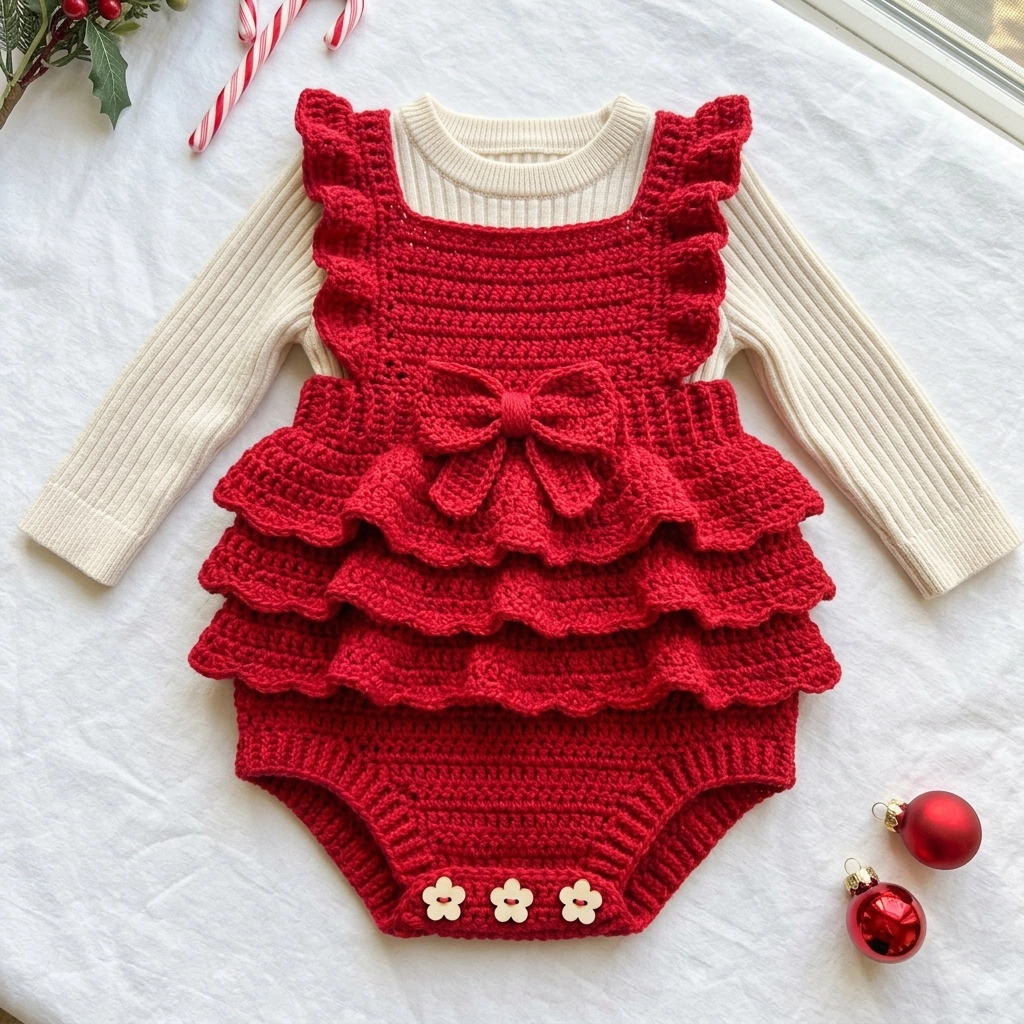
Oh, this little romper is going to make your heart melt. If you have a holiday photo session coming up or just want to create something show-stopping for a baby girl, this red ruffled baby romper with bow is absolutely perfect. The layered ruffles give it that dreamy, twirly look. The oversized bow at the waist adds sweetness without being fussy. And those little flower buttons at the bottom? Chef’s kiss.
I designed this crochet pattern with intermediate crafters in mind, but confident beginners can absolutely tackle it. If you can work basic stitches in the round and follow a simple increase pattern, you have everything you need. I will walk you through every single step.
This romper pairs beautifully with a simple long-sleeve onesie underneath, making it practical for cooler weather while still being the star of the outfit. Let me show you exactly how to make it.
Why You Will Love This Crochet Pattern
This baby romper crochet pattern hits all the right notes. It is charming without being overly complicated. The construction is logical once you understand it. You work the body first, then add the ruffles separately, which means you can customize how many tiers you want.
The bow is worked flat and sewn on, so you can position it exactly where you want. No fiddly attached-as-you-go techniques here.
What makes this romper special:
- Three tiers of cascading ruffles with scalloped edges
- Matching ruffled shoulder straps
- Ribbed waistband and leg openings for a snug fit
- Removable decorative bow
- Button closures at the crotch for easy diaper changes
This is the kind of project that looks incredibly impressive but is really just a combination of basic techniques done thoughtfully.
Materials and Tools You Will Need
Gather everything before you start. Nothing ruins momentum like stopping to hunt for a stitch marker.
Yarn:
- Approximately 200 grams of worsted weight yarn (weight category 4) in red
- I recommend a soft acrylic or cotton blend for easy washing
- Look for yarn with good stitch definition so the texture shows
Hook:
- 5.0 mm (H/8) crochet hook for the main body
- 4.5 mm (7) hook for the ribbing sections (optional but recommended for tighter texture)
Notions:
- Stitch markers (at least 4)
- Yarn needle for weaving ends and sewing
- Three small decorative buttons (flower shaped, approximately 12mm)
- Scissors
- Measuring tape
Gauge:
14 stitches and 16 rows = 4 inches in single crochet (sc) using 5.0 mm hook
Always check your gauge. This pattern is sized for 6 to 12 months, but gauge differences can change the fit dramatically. If your gauge is off, go up or down a hook size.
Finished Measurements
Size: 6 to 12 months
- Waist (unstretched): 17 inches
- Length from shoulder to crotch: 14 inches
- Leg opening circumference: 9 inches
The ribbed sections have stretch, so the actual fit accommodates a range of sizes within this window.
Abbreviations and Stitch Definitions
Let me define every stitch before we begin. If a term is new to you, read this section carefully.
ch = chain: Yarn over, pull through the loop on your hook. This creates the foundation for most crochet work.
sl st = slip stitch: Insert hook into stitch, yarn over, pull through both the stitch and the loop on your hook in one motion. Used for joining rounds.
sc = single crochet: Insert hook into stitch, yarn over and pull up a loop (2 loops on hook), yarn over and pull through both loops. The shortest and most basic stitch.
hdc = half double crochet: Yarn over, insert hook into stitch, yarn over and pull up a loop (3 loops on hook), yarn over and pull through all 3 loops.
dc = double crochet: Yarn over, insert hook into stitch, yarn over and pull up a loop (3 loops on hook), yarn over and pull through 2 loops, yarn over and pull through remaining 2 loops. Creates a taller stitch.
inc = increase: Work 2 stitches into the same stitch. This adds width.
dec = decrease: Work 2 stitches together as one. This removes width.
BLO = back loop only: Instead of inserting your hook under both loops at the top of a stitch, insert it only under the back loop (the one farther from you). Creates a ribbed texture.
FLO = front loop only: Insert hook under only the front loop (closest to you).
sk = skip: Do not work into this stitch; move to the next one.
Step by Step Crochet Pattern Instructions
The Diaper Cover Base
We start at the waist and work down to create the foundation of the romper. This is essentially a high-waisted diaper cover.
Waistband Ribbing:
Row 1: Ch 9. Sc in 2nd ch from hook and in each ch across. (8 sc)
Rows 2 to 60: Ch 1, turn. Sc in BLO across each row. (8 sc)
This creates a stretchy ribbed band. After completing row 60, fold the band so the first and last rows meet. Slip stitch the ends together to form a tube. You now have a circular waistband.
Body Section:
You will now pick up stitches along the long edge of the waistband to work the body downward.
Round 1: Working along the row edges of the ribbing, sc 60 stitches evenly around the bottom edge of the waistband. Sl st to join. Place marker. (60 sc)
Rounds 2 to 4: Ch 1, sc in each st around. Sl st to join. (60 sc)
Round 5: Ch 1, sc in next 14 sts, inc in next st, sc in next 29 sts, inc in next st, sc in remaining 15 sts. Sl st to join. (62 sc)
Rounds 6 to 8: Ch 1, sc in each st around. Sl st to join. (62 sc)
Round 9: Ch 1, sc in next 15 sts, inc in next st, sc in next 30 sts, inc in next st, sc in remaining 15 sts. Sl st to join. (64 sc)
Rounds 10 to 12: Ch 1, sc in each st around. Sl st to join. (64 sc)
Continue this increase pattern (adding 2 stitches every 4th round, placing increases at the hip areas) until you have completed 20 rounds total and have 70 stitches.
Divide for Leg Openings:
Round 21: Ch 1, sc in next 17 sts, ch 6 (for crotch opening), sk next 18 sts, sc in next 17 sts, ch 6, sk remaining 18 sts. Sl st to join.
Round 22: Ch 1, sc in each st and ch around both leg openings. Sl st to join.
You now have two separate leg openings.
Leg Ribbing:
For each leg opening, work ribbing the same way you did for the waistband.
Ch 7. Sc in 2nd ch from hook and across. (6 sc)
Work 36 rows in BLO, then join into a ring and attach to the leg opening with sl st around.
Repeat for the second leg.
The Shoulder Straps
The straps are worked flat with a ruffled edge on both sides.
Strap Base (make 2):
Row 1: Ch 41. Sc in 2nd ch from hook and across. (40 sc)
Rows 2 to 4: Ch 1, turn. Sc across. (40 sc)
Ruffle Edging on Straps:
Working along the long edge of one strap:
Row 1: Join yarn at corner. Ch 1, work 50 sc evenly along the side edge. Turn.
Row 2: Ch 3 (counts as dc), dc in same st, 2 dc in each st across. (100 dc)
Row 3: Ch 1, *sc in next st, sk 1 st, 5 dc in next st (shell made), sk 1 st.* Repeat from * to * across to create scalloped edge.
Fasten off. Repeat ruffle edging on the opposite long edge of the strap, then complete the second strap the same way.
Attach Straps:
Position straps at the front and back of the waistband, approximately 3 inches apart at the center. Sew securely with yarn needle.
The Three-Tiered Ruffles
This is where the magic happens. Each ruffle tier is worked directly into the front loops you left exposed on the body.
First Ruffle (Top Tier):
Join yarn in a FLO from Round 8 of the body.
Round 1: Working in FLO only, sc in each st around. Sl st to join. (62 sc)
Round 2: Ch 3, dc in same st, 2 dc in each st around. Sl st to join. (124 dc)
Round 3: Ch 3, dc in each st around. Sl st to join. (124 dc)
Round 4: Ch 3, 2 dc in next st, *dc in next st, 2 dc in next st.* Repeat around. Sl st to join. (186 dc)
Round 5: *Sc in next st, sk 1, 5 dc in next st (shell), sk 1.* Repeat around for scalloped edge.
Fasten off.
Second Ruffle (Middle Tier):
Join yarn in FLO from Round 14. Repeat the same ruffle pattern as the first tier.
Third Ruffle (Bottom Tier):
Join yarn in FLO from Round 19. Repeat the ruffle pattern once more.
The Decorative Bow
This adorable bow sits at the waist center and ties the whole look together.
Bow Loop (make 2):
Row 1: Ch 21. Dc in 4th ch from hook and across. (18 dc)
Rows 2 to 6: Ch 3, turn. Dc across. (18 dc)
Fasten off, leaving a long tail. Fold each piece so the short ends meet in the middle, creating a loop. Stitch in place.
Bow Center:
Row 1: Ch 7. Sc in 2nd ch from hook and across. (6 sc)
Rows 2 to 8: Ch 1, turn. Sc in BLO across. (6 sc)
Fasten off.
Assembly:
Stack both bow loops with seams at the back. Wrap the center piece around the middle tightly and stitch to secure. Sew the completed bow to the center front of the romper, just above the first ruffle tier.
Finishing Touches
Button Placement:
Sew three decorative flower buttons evenly spaced across the front of the crotch opening. These are decorative in this design, but you can add buttonholes to the back panel if you want functional closures.
Weaving Ends:
You will have quite a few ends from the ruffles and straps. Weave each one in carefully using your yarn needle, following the path of existing stitches for at least 2 inches before trimming.
Blocking (Optional but Recommended):
Wet block the finished romper by soaking it in lukewarm water, gently squeezing out excess moisture, and laying flat to dry. This evens out your stitches and helps the ruffles lay beautifully.
Tips for Success with This Baby Romper Crochet Tutorial
Keep your tension consistent. The ribbed sections need to be slightly tighter than the body to create that stretchy, fitted look. Switching to a smaller hook for ribbing helps achieve this naturally.
Count your stitches after every round. Especially during the increase rounds, it is easy to miss one. A quick count saves frogging later.
Mark the beginning of each round. Move your stitch marker up as you work. This keeps you oriented, especially when the ruffles start obscuring the body.
Block before adding ruffles if you are nervous. Some crafters find it easier to see where to attach ruffles on a blocked body. Personal preference here.
How to Customize This Pattern
Want to make this step by step crochet pattern your own? Here are some ideas.
Change the color. This romper looks stunning in cream, sage green, dusty pink, or even a variegated yarn for the ruffles.
Add more ruffles. Work additional ruffle tiers by leaving more FLO rounds exposed. Five tiers would be incredibly dramatic.
Skip the bow. For a simpler look, omit the bow entirely or replace it with a fabric ribbon.
Adjust the size. Add more increase rounds for a larger size. Work fewer for a newborn. The construction method scales easily.
Final Thoughts on This Crochet Pattern
This red ruffled baby romper with bow crochet pattern is one of those projects that feels special from the first stitch. Every ruffle you add makes it more adorable. The finished piece photographs like a dream and will absolutely be the centerpiece of any holiday outfit.
Take your time with it. Enjoy the process. And when you finish, I would genuinely love to see what you have made.
Tag me on Instagram or share your photo in my Facebook group. Seeing your creations is honestly the best part of designing patterns.
Thank you so much for choosing this pattern for your next project. Happy crocheting, friend.